
|
Home
| pfodApps/pfodDevices
| WebStringTemplates
| Java/J2EE
| Unix
| Torches
| Superannuation
|
| About
Us
|
|
|
Arduino for Beginners -- Next Steps
|
by Matthew Ford 16th December 2020 (original 8th
January 2012)
© Forward Computing and Control Pty. Ltd. NSW
Australia
All rights reserved.
Also see Arduino for Beginners, controlled by Android
This section covers topics and problems I have come across once I started writing my own Arduino programs.
If
you are looking for a simple way to control your Arduino project from
an Android mobile,
with no Android programming required,
then
check out pfodApp and the sample
Arduino projects shown there.
Which Version of Arduino IDE
to use?
Why Programming Arduino quickly
becomes 'Advanced'
What fails when you add
lots of Strings to your Arduino program (and how to fix it)
What's
wrong with Arduino's flush() - Why you should never call flush()
What
to do when the Arduino IDE runs very slowly.
How
to turn off compiler optimizations in the Arduino IDE (and why you
might need to)
How to see the Assembler
instructions your Arduino Code is producing. (does not work on
IDE V1.5)
How to write Timings and Delays in
Arduino (Why your program might fail after 50 days.)
There are a number of Arduino versions available. The latest one is available from http://www.arduino.cc/en/Main/Software but some boards and shields have problems running with the latest versions. Previous versions of the Arduino IDE are available from http://www.arduino.cc/en/Main/OldSoftwareReleases#previous
In general use the latest Arduino IDE from http://www.arduino.cc/en/Main/Software
The standard colour for the error messages is not very readable. You can set you own colour by changing the line
# GUI –
CONSOLE
# try Yellow for the error.color
console.error.color
= #FFFF00
In the theme.txt file in the lib\theme directory under the Arduino IDE install directory.
The Arduino system combining, 'standard' micro-processor boards, with non-trivial but easy to use libraries and an IDE that runs on Windows, Mac and Linux is very appealing. It lets lots of people do powerful things with minimal programming effort (or knowledge).
However, the underlying systems and languages that Arduino depends on to do all this are extensive, if not to say complex. Seemingly small changes can stop things working. Once you start to stray from the example uses of the libraries you quickly enter the world of 'Advanced' Arduino programming. Over time I intend to add to this page more information/links on how to navigate the pitfalls of 'Advanced Arduino' programming.
But first an over view of the systems that
Arduino depends on:-
The Atmel micro-processor
(ATmega328, ATmega328P, ATmega32u4, SAM3X8E ARM Cortex-M3,
ATmega2560, Atmega168 and others)
The Atmel
Assembler Language
The Compiler – GCC and
its AVR-Lib
The Arduino Language based on
C++
The Arduino Boards are
Incompatible – Why does the sketch I downloaded not run?
Each one of these systems introduces its own requirements and rules of use. If your program does not satisfy all of the requirements it will not work as expected. Starting at the bottom of the stack.
The 'stardard' Arduino boards use a variety of Atmel processors. Each processors is different from the others in it capabilities. All are ultimately controlled by their assembler language, which also varies from device to device.
So when you start to do something 'different' with your Arduino, start by understanding what your particular chip can do. Read the processors data sheet. Understand what pins are available, how many UARTs, ADC converters etc are available. The Arduino language attempts to shield you from most of this variation, but does not do it completely.
The .hex file that Arduino IDE uploads to your board is essentially a direct translation of the Atmel assember for that chip. The assembler is you most direct means of controlling the micro-processor. The other languages up the stack are all, in the end, reduced to this one. They all attempt to provide access to the same functionality that the Atmel Assembler gives you. At the lowest level you are flipping bits in registers and reading the results. You should familiarize yourself with the basic assembler commands, or their C equivalents, to set and read bits from the different types of registers available in the micro-processor.
The next level up is the GCC compiler which is a C/C++ compiler. This allows you to program using C programming constructs such as for loops, and if-then-else. The C programming language was not designed (and is not defined) for micro-processor use. The AVR-Lib bridges that gap. As well as having a working knowledge of C programming, you need to familiarize yourself with the extra feature/support provide by AVR-Lib. The AVR-Lib provides access and control of how various micro-processor capabilities are utilized. This interface is probably where most of your problems will occur. Read all the AVR-Lib FAQs and consult the of the documents.
In addition to AVR-Lib, the GCC compiler has its own rules and settings. The Arduino IDE does not let you change how the compiler is run (but see below for turning off optimization), however there are settings you can add on a file by file basis to control what it does. Consult the GCC documentation but AVR-Lib will probably be referred to more often.
Sitting on top of all of this is the Arduino
language based on C++. C++ is a very complex language which
contains all of the C language as a subset.
According to Linus
Torvalds (developer of Linux) “C++
is a horrible language” not suitable for low-level system
programming. He recommends using C instead.
In other words, the only way to do good, efficient, and system-level and
portable C++ ends up to limit yourself to all the things that are
basically available in C.
Fortunately you can mostly ignore the complexities of C++ when using Arduino, and just concentrate on the using the C language.
Coming
from C programming, the biggest difference I found was that
no-argument C++ class constructors do not want a () at the end of
their name. I.e when creating a pfodParser object, you use the
statement
pfodParser cmdParser;
NOT
pfodParser cmdParser();
The other point is, avoid creating library objects inside the loop() { .. } method. That is setup all your library objects outside loop(){ … } method. Create an instance of them at the top of the sketch, or if they are a pre-defined instance, like Serial, then initialise them in the setup() {.. } method.
Unless
you are writing your own libraries, that is about all you need to
know about C++. But you will need to know about C statements and flow
constructs.
See http://arduino.cc/en/Reference/HomePage
and this C
Tutorial on C statements, but in the C Tutorial ignore the stuff
about main()
and
getchar()
and
scanf().
Adruino creates a main()
for
you. In Arduino, you put your code in the setup() and loop() methods
and you read and write using the Serial methods.
There are also
specialist books on C programming for Adruino but I have not review
any of them.
The reference pages for the Arduino language are known to be in need of some work. Sometimes it is easier to dig around in the Arduino source code to see what a command actually does.
The Arduino Language attempts to shield you from the variations of the underlying micro-processors. It defines a fixed frame work for wiring a program and provides high level functions such as digitalWrite() , digitalRead() and analogWrite() (PWM) to access some of the micro's capabilities. More high level functionality is supplied by libraries. The Arduino IDE provides a simple way to program, compile and load resulting into the micro-processor without having to set up and control the GCC + AVR-Lib and hardware programmer.
An Arduino 'compatible' board, including the official Arduino.cc boards, has a very limited level of compatibility. For some idea of the number of 'compatible' boards available see http://shieldlist.org/
What you can expect from an “Arduino compatible” board? (Ignoring the Arduino Esplora)
You can expect that the board can be programmed from the Arduino IDE, possibly after adding extra libraries and drivers. The physical connection is often, but not always, USB.
You can expect an Atmel 8bit processor. (Update: Even this is no longer true. A number of other 32bit micros are now supported under the Arduino IDE).
You can expect some digital inputs and outputs labelled D0 to D9 (except for Esplora board). The availability of D10 upwards depends on the particular board. D0 and D1 are often taken for the Serial connection.
You can expect a Serial connection RX,TX typically D0, D1. Most, but not all, boards have protection resistors in these lines but check your board's circuit before using these pins for other functions.
That's about it. All other features are board/processor specific. Here are some of the common features that vary from board to board and may stop your downloaded sketch from running as expected on your 'Arduino' board.
Board Voltage: Varies from 2.7V to 5V for board pins and from 2.7V to 12V for the power supply. It is very important you get this correct. You can damage the micro-processor if voltage applied to the board or its pins is too high. This means shield and add-on boards may not be compatibile without adding level shifters.
LED (D13) – This looks like it should be standard but on at least one board, FioV3, it is used as input and should not be used to drive the LED. (As of V1.5 of the IDE, there is a pre-defined constant, LED_BUILTIN, which can be used to assess the boards led.
PWM outputs, analogWrite(pin, value), the number available varies from 4 to 15 but are not on any standardized board pins (D??).
Analog inputs, analogRead(pin), A2 to A4, are available on almost all boards and A0, A1 are also available on most boards (except Lilypad) but the maximum input voltage range depends on the board voltage. As well as this the available voltage references also vary from micro-processor to micro-processor.
Serial1, Serial2 etc. connections are available on some boards. Otherwise the SoftwareSerial library needs to be used to obtain a second serial connection (one that is not used for programming the board)
ISP and I2C is available on almost all boards but the pins used are not standardized.
Timers – one timer is used for the millis() function and another timer may be used for the PWM function on some pins. Additional timers are available on some micro-processors.
Interrupts – There are a number of input interrupts that can be accessed by sketches, but again the digital pins numbers (D??) are not standardized.
Memory (SRAM, Flash, EEPROM) – The different micro-processors used on different boards have different amounts of memory available. So a program code for another board may not even load on your board because there is not enough Flash memory. SRAM is also often a problem but harder to diagnose. Adding extra libraries and extra varables and more method calls all use up SRAM. When all the SRAM is used your program will start acting strangely. See What fails when you add lots of Strings to your Arduino program (and how to fix it) for more information. Some boards (Due for example) don't have any EEPROM at all.
Assembler Code – The library you downloaded uses assembler to do its work, but was only coded for 8bit Atmel micros and does not run on the 32 bit micro based board you are using.
In summary, if the sketch you want to use does anything other then read or write D2 .. D9, you need to check the features of the micro-processor on your board and the wiring of the micro-processor pins to the board pins and modify the sketch accordingly. The Arduino libraries make an effort to adjust themselves to the each board, but all libraries are not always available for all boards.
While the Arduino Language is base on C++ it differs in some ways that may be confusing.
In Arduino, a boolean variable (i.e true or false) is declared with type boolean while in C++ it is called bool. So in an .ino file you can say either boolean OR bool, since Arduino translates to C++ before compiling (although only boolean will be highlighted as a keyword). BUT in a .cpp or .c file you should use bool. However just to confuse things a bit more, if the .cpp or .c file includes <Arduino.h> then boolean will also be accepted.
You should also remember that neither Arduino, nor C++ nor C have a true boolean type. In all cases they use an int to hold the value and in if statements, if the int is 0 then it is false otherwise any other value is regarded as true. If you are writing a .cpp Arduino library, you need to #include <stdbool.h> or #include “Adruino.h” to have true and false defined. If you are writing a sketch you don't need to do any thing special to use true and false, the IDE automagically defines true and false when it compiles your sketch.
Update: 2014 Dec 16: It turns out that the differences between Arduino's boolean and C++'s bool is causing the linking process to generate incorrect code on ARM processors using GCC 4.8.1/4.7.2 (IDE 1.6.0 (rc1)) Earlier IDE releases appear to be unaffected by this bug.
When you start using the pfodApp to control your Arduino project, you start adding more strings to your code to send screen messages to pfodApp to display options for the user to choose. At some point your Arduino program will start to fail in odd ways.
Two typical failures observed via the Arduino's IDE Serial Monitor are:-
i) The program stops printing the setup
message. That is the message you send to the Serial stream in the
setup code likeSerial.println("IRTemp
Meter for Android");
Serial.println("~~~~~~~~~~~~~~");
You have just added another string for another Serial print() statement and on the next test run the program stops printing out these startup strings.
ii) The program starts printing garbage characters instead of printing your strings.
In both cases you have run out of RAM (SRAM) in which to store your strings. RAM in most Arduino boards in 1K to 2K bytes. It is used for the program stack when you call and return from routines, and for storing variables, and in the code above, for storing the hard coded strings mentioned in your program. When the all RAM is used up the program starts to behave in strange ways.
But, wait a minute, you say, RAM is not maintained on power down so how do these strings get into RAM. Well, to quote from PART I - PROGMEM BASICS,
“Initial variable values and strings are copied out from program memory into RAM as part of the C startup routines, which execute before your main() function. Those startup routines give your globals their initial values, as well as ensure that all strings are inside RAM so they can be passed to your desired string handling routines. As more strings are added to your program, more data must be copied to RAM at startup and the more RAM is used up by holding static (unchanging) data.”
So as you add more strings you use up not just program Flash but RAM also. What a wasteful and ultimately fatal approach.
The solution I use is the one suggested on the Arduino site, use the F( ) syntax. i.e. the code above becomes
Serial.println(F("IRTemp
Meter for Android"));
Serial.println(F("~~~~~~~~~~~~~~"));
That's all you need to do just wrap your strings in F( ). No other code is needed as all the necessary support code is automagically included in your sketch when the IDE compiles it. (If you are writing a .cpp library for Adruino, then the support in included when you #include “Arduino.h” at the top of your .cpp file.)
As a matter of interest here is the code that
supports the F( ) syntax in Arduino,
NOTE:
Do NOT add this code to your sketch, the IDE supplies all this code
automagically when it compiles you sketch. Just use the F( ) wrapper
around your strings as shown above.
#define PSTR(s) ((const PROGMEM char *)(s))class __FlashStringHelper;#define F(string_literal) (reinterpret_cast <__FlashStringHelper *> (PSTR(string_literal)))size_t Print::print(const __FlashStringHelper *ifsh){const char PROGMEM *p = (const char PROGMEM *)ifsh;size_t n = 0;while (1) {unsigned char c = pgm_read_byte(p++);if (c == 0) break;n += write(c);}return n;}
The F( ) syntax just puts the string in Program memory (Flash) and casts the resulting point to a unique class. This unique class insures that the correct print( ) method is called to read the bytes from the program memory and write( ) them.
Any class the inherits from Print can use this approach. That includes Server, Steam, Client, HardwareSerial, SoftwareSerial and UDP.
That's all there is to it. Using the F( ) macro you can send lots of screens to your pfodApp users without your Arduino program breaking.
The bottom line is that because of the inconsistent way Arduino has implemented the flush() method in various classes, you don't know what it will do until you find out which flush() is being called and analyse the code. Some versions of flush do nothing (best), some versions of flush block while any buffered data is written out (delays are evil), some versions of flush delete any buffered incoming data that you have not read yet, you loose that data (very evil)
Consider the following method. This method uses object pointers and depends on C++ inheritance so it is advanced Arduino programming.
void writeAndFlush(Stream *out, char *str) {
  out->println(str); // this calls println in the object pointed to by the Stream pointer    out
  out->flush();  // this calls flush in the object pointed to by the Stream pointer   out
}
This method looks simple enough, but because of the inconsistent
ways flush() is implemented, you don't know if the call to flush()
will do nothing are return immediately with out blocking, or if it
will block while str is written or if it will return quickly but
delete any buffered incoming data so you that you loose any data you
have not read from Stream out.
What this method will do depends on what type of Stream * is passed to it. A HardewareSerial pointer, like &Serial, will block waiting to write the str. A SoftwareSerial pointer or a WiFiClient pointer will delete all you incoming un-read data. An EthernetClient pointer will do nothing when its flush is called.
When you computer has many COM ports enabled (mine had 9), the Arduino IDE runs very slowly, particularly when opening the “Tools” menu to access the Serial Monitor. In my case these extra COM ports were all associated with Bluetooth connections I had made for testing. Deleting these COM ports did not help as Windows re-installed them on the next reboot.
There are two fixes for this:-
I) Open “Device
Manager” on Windows machines and right click each bluetooth COM
port and choose Disable.
II) Turn off the Bluetooth on your
computer. My computer has switch on the case to turn off Bluetooth
and Wifi, but that turns off the WiFi also. Your computer should also
have an option to disable just the bluetooth. On my Sony Vaio, a
dialog box comes up after reboot which lets me turn off just the
bluetooth and leave the WiFi running.
This section has been updated to describe a method that works will all Arduino IDE versions.
By default when the Arduino IDE compiles your sketch (using GCC and AVR-Lib) it uses the -Os optimization setting for the compiler. This optimizes for size, which is important when programming a micro with limited program memory. However the compiler sometimes gets it wrong and optimizes away code that really needs to be there.
There are all sorts of settings, keywords, pragmas, etc. that you can set to control how the compiler treats your code. See My program doesn't recognize a variable updated within an interrupt for one example of using the volatile keyword to prevent the compiler optimizing away necessary code.
So when you program does not do what you expect, it may be due to compiler optimizations, but most likely you have just made a mistake in the code somewhere. However it is sometimes helpful to remove the possibly of it being a compiler problem.
The
gcc compiler optimizations are set in the platform.txt files. The
platform files are in the Arduino install directory under
\hardware\<microType>\ for
example
….\arduino-1.5.6-r2\hardware\arduino\avr\platform.txt
OR
….\arduino-1.5.6-r2\hardware\arduino\sam\platform.txt
In the platform.txt file here are lines like
compiler.c.flags=-c -g -Os -w -ffunction-sections -fdata-sections -MMD
compiler.c.elf.flags=-Os -Wl,--gc-sections
compiler.cpp.flags=-c -g -Os -w -fno-exceptions -ffunction-sections -fdata-sections -MMD
The
-Os
in
these lines are the optimization options. A
complete list of gcc optimization options is available here.
To
turn the optimizations off, first take a copy of the original file
somewhere else and then remove all the -Os settings.
This is the
same as using -O0
Do not
optimize which
is the default if none is specified.
That's all there is to it. Restore the original platform.txt when you are finished (or you can re-install Arduino if you really mess thing up).
When the Arduino IDE compiles your sketch, it first translates it into C++ and then calls GCC with AVR-Lib to compile it to Atmel Assembler instructions for loading into your board. This Disassembler tool produces a .cpp.lst file of you sketch, which contains the assembler instructions intermixed with the C++ statements. Unfortunately the translation Arduino does on your code removes most of your source code from this listing, but you can still identify the method calls your code is making and have some pointers to the code generated from your sketch. For the libraries, the actual source code is reproduced in the listing so you can more easily see what happened.
This is an addon tool for Arduino 1.0.1, 1.0.2 or 1.0.3 that will install an extra menu item in the Tools menu, “Compile and Disasssemble” which will run a compiler and generate a <sketchName>.cpp.lst file in your sketch directory. This .cpp.lst file will contain all the assembler code produced together with the .cpp source code. See below for an example of how your sketch code is listed.
To install this tool, download the zip file Disassembler.zip and unzip it to the 'tools' directory of either Arduino installation or your Arduino user path.
The Arduino installation tools path was C:\arduino\arduino-1.0.1\tools on my windows machine. On Mac this path may not be accessable in that case unzip the file to your Arduino user path.
If installing in your Arduino user path, you will need to create the “tools” directory first. The Arduino user path can be found by starting the IDE, a new empty sketch is shown, then choose File → SaveAs. This will by default prompt you to save this new sketch in your Arduino user path. On my windows machine this path was matthew\My Documents\Arduino (full path is C:\Users\matthew\My Documents\Arduino).
Close the Arduino IDE before continuing. In that Arduino directory first create a tools sub-directory, C:\Users\matthew\My Documents\Arduino\tools , then unzip the Disassembler.zip file to that tools sub-directory.
In either case after unzip Disassembler.zip to the tools directory you should then have a sub-directories like, C:\Users\matthew\Documents\Arduino\tools\Disassemble\tool and in the tool directory there should be disassembler.jar. Note there is a tools sub-directory and also a tool sub-directory, which can be a little confusing. You unzip to the “Arduino\tools” sub-directory and that will create the Disassembler\tool sub-directory.
Then restart the Arduino IDE and you should have a new menu item in the Tools menu
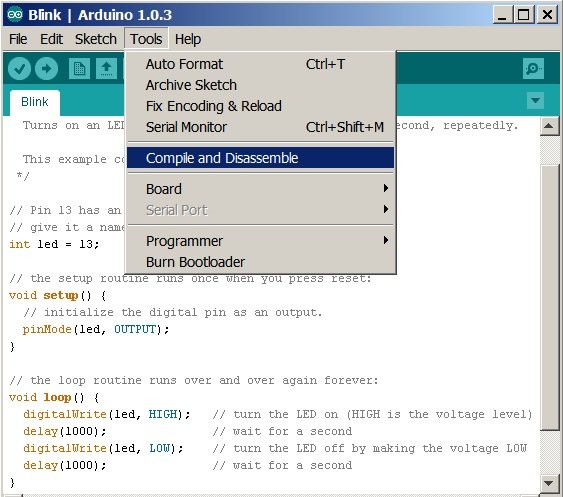
This menu item will compile the current sketch and produce the .cpp.lst file BUT will NOT try and load to the current board.
Open the Blink.ino example sketch from “Examples → 01. Basic” menu.
Run
the “Compile and Disassemble” tool. Then go to the
directory that has the Blink.ino file. On my windows machine that
directory was C:\arduino\arduino-1.0.3\examples\01.Basics\Blink. In
that directory there will be two files, Blink.ino, the sketch file
and Blink.cpp.lst the disassemble output file.
(Ignore the error
msg in the screen log “Couldnt determine program size: {0}”)
Open the Blink.cpp.lst file in a text editor and search for void loop()
// the loop routine runs over and over again forever:
void loop() {
  digitalWrite(led, HIGH);   // turn the LED on (HIGH is the voltage level)
 100:   80 91 00 01     lds     r24, 0x0100
 104:   61 e0           ldi     r22, 0x01       ; 1
 106:   0e 94 b8 01     call    0x370   ; 0x370 <digitalWrite>
  delay(1000);               // wait for a second
 10a:   68 ee           ldi     r22, 0xE8       ; 232
 10c:   73 e0           ldi     r23, 0x03       ; 3
 10e:   80 e0           ldi     r24, 0x00       ; 0
 110:   90 e0           ldi     r25, 0x00       ; 0
 112:   0e 94 e5 00     call    0x1ca   ; 0x1ca <delay>
  digitalWrite(led, LOW);    // turn the LED off by making the voltage LOW
 116:   80 91 00 01     lds     r24, 0x0100
 11a:   60 e0           ldi     r22, 0x00       ; 0
 11c:   0e 94 b8 01     call    0x370   ; 0x370 <digitalWrite>
  delay(1000);               // wait for a second
 120:   68 ee           ldi     r22, 0xE8       ; 232
 122:   73 e0           ldi     r23, 0x03       ; 3
 124:   80 e0           ldi     r24, 0x00       ; 0
 126:   90 e0           ldi     r25, 0x00       ; 0
 128:   0e 94 e5 00     call    0x1ca   ; 0x1ca <delay>
}
 12c:   08 95           ret
There you can see the 'optimized' assembler code produced from your sketch.
All the library code used is also listed. Here is part of the listing for the pinmode( ) library call.
void pinMode(uint8_t pin, uint8_t mode)
{
     584:       cf 93           push    r28
     586:       df 93           push    r29
        uint8_t bit = digitalPinToBitMask(pin);
     588:       48 2f           mov     r20, r24
     58a:       50 e0           ldi     r21, 0x00       ; 0
     58c:       ca 01           movw    r24, r20
     58e:       8c 50           subi    r24, 0x0C       ; 12
     590:       9f 4f           sbci    r25, 0xFF       ; 255
     592:       fc 01           movw    r30, r24
     594:       34 91           lpm     r19, Z+
        uint8_t port = digitalPinToPort(pin);
     596:       4a 52           subi    r20, 0x2A       ; 42
     598:       5f 4f           sbci    r21, 0xFF       ; 255
     59a:       fa 01           movw    r30, r20
     59c:       84 91           lpm     r24, Z+
        volatile uint8_t *reg, *out;

        if (port == NOT_A_PIN) return;
     59e:       88 23           and     r24, r24
     5a0:       69 f1           breq    .+90            ; 0x5fc <pinMode+0x78>
One final word. The assembler generated is 'optimized' to reduce size and improve speed, so it is not a one for one with the source code but it should still produce the same result. Also this tool is basically a modified copy of Arduino's Compile class, but with some java code to access other variables in the Arduino's IDE that are not normally made available to tools. This makes the tool very version dependent. If the next version of Arduino's IDE changes the names of those variables this tool will fail to load. Until then you will find it useful to check just what instructions your board is executing.
Using delay() in your programs wastes a lot of you CPU processing power. However replacing delays requires some care. This page explains in a step by step way how to replace delays in a reliable way.
For use of the Arduino name see http://arduino.cc/en/Main/FAQ
The General Purpose Android/Arduino Control App.
pfodDevice™ and pfodApp™ are trade marks of Forward Computing and Control Pty. Ltd.

Contact Forward Computing and Control by
©Copyright 1996-2020 Forward Computing and Control Pty. Ltd.
ACN 003 669 994