
|
Home
| pfodApps/pfodDevices
| WebStringTemplates
| Java/J2EE
| Unix
| Torches
| Superannuation
|
| About
Us
|
|
|
Android Controlled LCD/LED Display
|
by Matthew Ford 28th November 2014
(original 12th September 2012)
© Forward Computing
and Control Pty. Ltd. NSW Australia
All rights reserved.
Adruino LCD display (with bluetooth) – the pfodDevice (Click photo for full size image) and Android remote control screens – the pfodAppTM


Buy the components listed in the parts list.
Install the Arduino IDE from http://arduino.cc/en/Guide/HomePage
Download the pfodParser library zip file and unzip it to your arduino/libaries directory. (Open the Arduino IDE File->preferences window to see where your local Arduino directory is). Do NOT use the Arduino IDE Add Library command. It does not work with this zip file and does not allow existing libraries to be updated. Unzipping the file manually, overwriting any existing files, is safest.
Open a new File and copy this code to the IDE window, plug in the Arduino Uno via the usb cable and program it. Then un-plug the USB cable.
Set the switches on the Bluetooth board. Set the 3V/5V switch to 5V and set the To Board/To FT232 switch to the To Board position.
Plug the three boards together Arduino, Bluetooth, LCD Display board. Make sure the pins all line up correctly.
Plug the 9V supply into the Arduino board so that it will power all three boards.
Download the pfodApp to your Android mobile.
Pair your mobile with the Bluetooth shield and setup a pfod connection called LCD Display, as described here.
Start pfodApp and connect to the LCD Display to set the text and set the display options.
Finished.
This project allows you to remotely set the display text on the Arduino LCD/LED display from your Andriod mobile by adding a bluetooth module and a small amount of code to make your Arduino device a pfodDevice. The code presented here contains a full pfod message parser which can be used for all your other Arduino project to make them controllable from your Android mobile without any Android programming. This project also does NOT require any soldering.
pfodDevice's are controlled by a pfodApp. Imagine HTML re-designed for micros with short simple messages each less than 255 bytes to describe the pages. The pfodApp is the micro-browser and the pfodDevice is the micro-server. When the pfodApp running on your Andriod mobile connects, via bluetooth, to your Arduino, the pfodApp sends the request {.} which asks for the pfodDevice's main menu. The pfodDevice return a short messsage (max 255 bytes) which the pfodApp renders to give the user choices that control the pfodDevice. When your user selects a button or menu item, the pfodApp sends the associated command back to your Arduino to execute that function. Commands are typically a single character enclosed by { }. Your Arduino code extracts the command character from this message, using the simple parser below, and executes the associated function.
That's all there is to it. No Android programming is required and the only additional programming you need in your Arduino is the small command parser. All the text and prompts displayed on the Android mobile are completely controlled by the code in the Arduino. You can quickly and easily change the user interface by changing you Arduino code.
The same Andriod pfodApp can control any Arduino or other micro-controller which has been coded as a pfodDevice.
If you want to test out how the pfod micro-pages will look on pfodApp, then set up a bluetooth serial connection to your pc as described here and type the micro-pages into the terminal window and see how pfodApp displays them. This also lets you see what messages the pfodApp will return for various user inputs.
The pfod Specification has been designed to keep the micro-controller code (the Arduino code) simple. The micro-controller does not and should not remember the user's navigation history, the Android pfodApp does all that. The micro-controller should simply execute the function associated with the command it is sent and return a result message (often just {} ). See the pfod Specification for all the details and examples.
Here is what you need for this project:- pfodApp V1.2 from Android Market
Parts for the remote controlled LCD display – Ardunio Uno or similar and the Arduino IDE, USB cable, a 9V supply, a bluetooth shield, an LCD display.
Here is list of the parts I used and where I purchased them.

(Click
image to open full size image)
In order to communicate with the pfodApp on your Android mobile, the Arduino needs to be coded as a pfodDevice. The pfod Specification details what functionality must be supported in order to be a pfodDevice. As you would expect the requirements for the pfodDevice are minimal
The pfodDevice is required to:-
1.
Respond to all messages, even unrecognised ones, with a reply
message. This reply message can be the Empty message, {}
2.
Respond to the GetMainMenu request, {.}
, with a main menu or navigation input of top level functionality or,
less commonly, with one of other messages:- SingleSelectionList,
MultiSelectionList, UpdateMenu StreamingRawData, StringInput,
NumericInput or the Empty message {}
3. Ignore messages whose
length exceeds 255 bytes, including the start and end {
} bytes.
4. If the connection is
half-duplex then the messages from the pfodApp
to the pfodDevice take precedence over, and can interrupt, streaming
raw data coming from the pfodDevice.
For the remote control of the LCD/LED display we will need to parse pfod messages that contain user input in addition to a command. The parser provided here will parse any pfod message and so can be used for all you pfodDevices. (See Garage Door Remote for a simpler parser that only handles single character commands with no arguments)
Copy this pfodParserTest.ino file in the Arduino IDE and load it to your Arduino. No need to add any shields at this time.
Open the Serial Monitor and try the following inputs
(notice the ` character is the char below the ~ on the
US keyboard)
{testCmd|fred`mary}
{nTest|-55`0`33333}
The output should be as shown below.
Note: if the command starts with 'n', then this test program will also display the arguments as numbers. The first message's arguments are only displayed as strings while the second message's arguments are displayed as strings and numbers. Since your Arduino code determines the command that will be returned, your code knows which commands will have numeric arguments and which will have string arguments.
No pfod message sent to a pfodDevice mixes numeric and string arguments. All pfod messages sent to a pfodDevice either have all string or all numeric arguments.

The parser does minimal error checking as it expects the pfodApp to send it correctly formed messages. Basically the only error checking is does is for a missing message closing }
The
basic Display Controller being coded here will:-
a) Allow you to
enter multi-line text to be displayed
b) Allow you to select the
display settings, Blinking and/or Scrolling.
To access these two functions a top level menu will be used as the initial screen.
To design and test these screens and to see what messages the pfodApp returns when the user makes a selection, make a serial bluetooth connection between your mobile and a terminal session on you computer. See Serial Bluetooth Connections from your Mobile Phone to your PC for details on how to make this connection. Then follow the steps described here to connect to your terminal session from your mobile's pfodApp.
Once you have set up this serial terminal connection between your pfodApp and your computer, you can type in test micro-pages into your terminal window and see what the pfodApp displays. Then you can make selections on your mobile and see what messages are returned that your pfodDevice will need to parse.
Open the terminal window and connect to your PC from you pfodApp. The first message the pfodApp sends is the getMainMenu message, {.}
Here we what to respond with a two item menu allowing the user to set the text to be displayed and to setup the display for scrolling and/or blinking.
The
following micro-page message will display the two item menu.
{.LCD
Display|a~Set Text|b~Setup Display}
and
associated the cmd a with the Set Text menu item and the cmd b with
Setup Display menu item. See the pfodSpecification
for all the details.
When the user selects the Set Text menu item
the pfodApp send back the associated cmd, i.e. {a}
shown here. Similarly when the user select the Setup Display menu
item, the pfodApp will send back the message {b}
The Arduino code has to handle these two responses.

As shown above, when the user clicks the Set Text menu item, the pfodApp sends back the associated command {a}. When the pfodDevice, the Arduino code, processes this message it needs to send back a user text input screen to let the user enter/edit the text to be displayed. The Arduino code needs to build this message using the currently displayed text. See the code for the details. As an example lets assume the current display text is Test Text. The the message sent back would be.
{'c`160~Enter text for to display. (maxmimum 160 chars)|Test Text}

and your mobile would display

This pfod micro-page is a text input page {' associated with the command c and with a limit of 160 bytes `160 and with a prompt of ~Enter text to display. (maximum 160 chars). The actual text to edit follows the | See the pfodSpecification for more details.
When the user edits the text and presses the accept button, the pfodApp sends back the command associated with this screen together with the edited text. For example if the user edits the text to New Text and presses accept. The pfodApp sends back
{c~New Text}
The pfodDevice, the Arduino code,
needs to
i) recognise the command c
and then
ii) process the text argument New
Text to set the display text. See
the completed code for the details on processing the display text.
The Arduino also needs to save the edited text so that it can be sent to the pfodApp the next time the user opens the Set Text screen so they will have the currently displayed text to edit.
Once the message is processed a response must be returned. In this case just an empty message, {} It is up to the pfodApp to keep track if the menu hierarchy and to re-request the appropriate menu from the pfodDevice. This keeps the code in the pfodDevice simple.
As shown above, when the user clicks the Setup Display menu item, the pfodApp sends back the associated command {b}. When the pfodDevice, the Arduino code, processes this message it needs send back the multi-selection list of display options, ie. Blinking and Scrolling. The Arduino code needs to build this message from the current settings for blinking and scrolling.
{*d`0`1~Choose the Display features you want|Blinking|Scrolling}
The arguments `0`1 after the command d, are the zero based indices to the list of features that are currently selected. In this case both Blinking and Scrolling.


When the user just presses the Accept button then the pfodApp returns the command associated with this screen and the indices of the selected items.
For example if the user de-selects Blinking and presses the Accept button

The pfodApp returns {d|1}

The pfodDevice, the Arduino code, needs to parse the numeric arguments returned to determine which features the user selected and then make the appropriate changes to the display. See the code for the details. Once the message is processed a response must be returned. In this case just an empty message, {}
The complete Arduino code is available in this file. Open it and copy it to a new window in the Arduino IDE and program the Uno board. (You need to install the pfodParser libraries as described above)
If you are using an other Display other then the one listed in the parts list, you may need to change the initialization code at the top of the file.
LiquidCrystal lcd( 8, 9, 4, 5, 6, 7 ); // set pins to suite freetronics LCD shieldCheck the documentation for your display board and edit these pin numbers to match.
The code has a number of methods to:- parse the pfod messages, retrieve the command and the arguments and covert the numeric arguments to numbers. These methods are from the pfodParser library. The code also has methods to:- break process the commands and break the display text into lines and set the blinking and scrolling. Further methods perform the actual blinking and scrolling. See the comments in the code for the details.
Now that you have programmed your Arduino, you plug in the LCD display and test out all the messages from the Arduino's IDE Serial Monitor.
Here is the Serial Monitor output after the following
two messages were entered
{.}
{a}
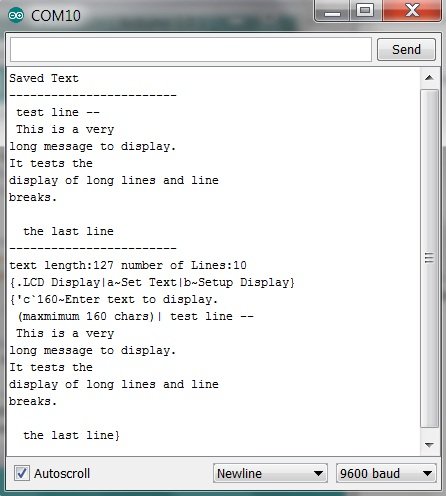
You can see the message that will be returned to the pfodApp running on your mobile. These look good, but you can test them by pasting them into the Terminal window that is connected to you mobile bluetooth serial connection and see that you get the screens displayed as you expect.
Finally if all is well you can plug the three boards together, the Arduino Uno, the bluetooth shield and the LCD display shield. Note: on the bluetooth shield make sure 3V/5V switch is set to 5V and To Board/To FT232 switch to the To Board position. The plug in the power supply.
Download the pfodApp from the Android market.
Then make a connection between your mobile and the bluetooth shield as described in the pfodApp Getting Started Guide. Then open the pfodApp and set up a connection to LCD display as also described in the pfodApp Getting Started Guide.
The open the pfodApp on your mobile and connect to LCD Display. You will be presented with the main menu from which you can set the test and display options that you have programmed.
But what about all this debugging code in the Arduino program? That is not a problem for the pfodApp. Since it is sent outside the message start and end chars, { }, the pfodApp ignores it for display purposes. However it keeps it in its debug screen, accessed from the mobile's menu, where all communication to and from the pfodDevice is captured. Here is a screen shot of the debug screen after setting the scrolling display option. You can see the {d|1} message sent from the mobile to the pfodDevice, and the debug messages sent back and then the empty reply, {}.
Then, you can see, the pfodApp automatically re-request the previous menu, in this case the main menu, {.}, and the pfodDevice responds main menu again.

The code presented here uses an LCD display module. However there are other display modules available. For example if you wanted a BIG LED display you could use this Dot Matrix Display 32x16 Red from http://www.freetronics.com You can daisy chain these LED displays to make really BIG displays. You will need to use freetronics DMD library and you will need to change the code to call the appropriate methods to display/scroll the text. These code changes are left as an exercise to the reader.
Once you have this LED display running you could look at providing more display options, such as scrolling left then right then flashing in sequence.
This LED display is big enough to be uses as point of sale advertising and being able to set the text and display options from a mobile means a shop keeper could use it himself.
AndroidTM is a trademark of Google Inc. For use of the Arduino name see http://arduino.cc/en/Main/FAQ
The General Purpose Android/Arduino Control App.
pfodDevice™ and pfodApp™ are trade marks of Forward Computing and Control Pty. Ltd.

Contact Forward Computing and Control by
©Copyright 1996-2020 Forward Computing and Control Pty. Ltd.
ACN 003 669 994