
|
Home
| pfodApps/pfodDevices
| WebStringTemplates
| Java/J2EE
| Unix
| Torches
| Superannuation
|
| About
Us
|
|
|
Cannot Connect
|
by Matthew Ford 11th December 2013
©
Forward Computing and Control Pty. Ltd. NSW Australia
All rights
reserved.
There can be a number of reasons for connection problems. This page will go through the connection steps and help you isolate the source of the problem.
Follow the steps below to workout where the problem is.
These instructions assume you are trying to connect to an Arduino board with a bluetooth module attached, but they are also applicable to connecting to any micro via bluetooth. There are two sections to this fault finding. The first section, uses a test sketch to check that your bluetooth module is running properly connected to your Arduino board. The second section shows you how to debug your own sketch to get it to work with pfodApp.
With the release of Android V4.2, a new bluetooth stack was introduced in the Android Operating System. This new bluetooth stack has experienced a lot of problems which are continuing as of Android V4.4. Typical problems include being unable to pair bluetooth devices, unable to connect and loss of connection.
“A surprising number of people have cleared up
a lot of their issues by disabling the 5 GHz Wi-Fi band, or shutting
down Wi-Fi altogether. While unusual, this radio may be causing
interference for the Bluetooth radio. I could make guesses as to how
this would happen, but I’m not an expert in this area, so I’ll
leave that for somebody with more experience.”
(http://www.androidpolice.com/2013/12/28/bug-watch-many-nexus-devices-still-suffer-from-assorted-bluetooth-issues/)
See the above link for more details and possible fixes for the problem. One (drastic) solution is to purchase a Nexus One phone, which runs Android V2.3. This phone appears to be very stable.
You will have completed
Section 1 when you can see this screen on your mobile.
Connect your Arduino to the IDE and program it with one of the test programs below, depending on which Arduino board you are using. These test sketches return a main menu with just one button. “Success”
If your board is an Uno, Ethernet , Nano, Pro-Mini, Mini or Fio, (not FioV3) use this sketch, pfodConnectionTestSketch.ino, and connect your bluetooth to pins RX (D0)/ TX (D1) after you have finished programming the board
If your board is Leonardo,Yun , Micro or FioV3, use this sketch Serial_1_ConnectionTestSketch.ino instead, it uses Serial1, connect your bluetooth to pins RX (D0)/ TX (D1)
If your board is Due, Mega ADK or Mega2560, these have multiple hardware Serial connections, use sketch Serial_1_ConnectionTestSketch.ino and connect your bluetooth to pins 19 (RX) and 18 (TX).
These sketches set the board rate at 9600. If your bluetooth module is set to a different baud rate, change the Serial.begin(9600) to match the baud rate of your bluetooth module.
Plug in or wire up your bluetooth module. If your bluetooth module uses Serial (i.e. pins RX (D0)/ TX (D1), as most do, having the module connected will interfere with programing Arduino so make sure the bluetooth module is disconnected before programming or the download will fail.
Follow the instructions in pfodAppForAndroidGettingStarted.pdf under Setting up a Bluetooth Connection and Adding a Bluetooth connection to pfodApp to pair your bluetooth module with your mobile and set up a new connection. I called my connection “Test”
Having paired your
mobile with the bluetooth module and setup a pfod connection. Start
pfodApp and click on the test connection. 
Very important: You must have an internet connection when you do this as this one of the places the pfodApp does a licence check.
The pfodApp first tries
to make a connection to your bluetooth module and then requests the
main menu.
While trying to connect the pfodApp displays
This
message usually only flashes up for a few seconds until the bluetooth
connection is established.
If the connection from
your mobile to the bluetooth module fails, the pfodApp will display
this “Connection Failed” message.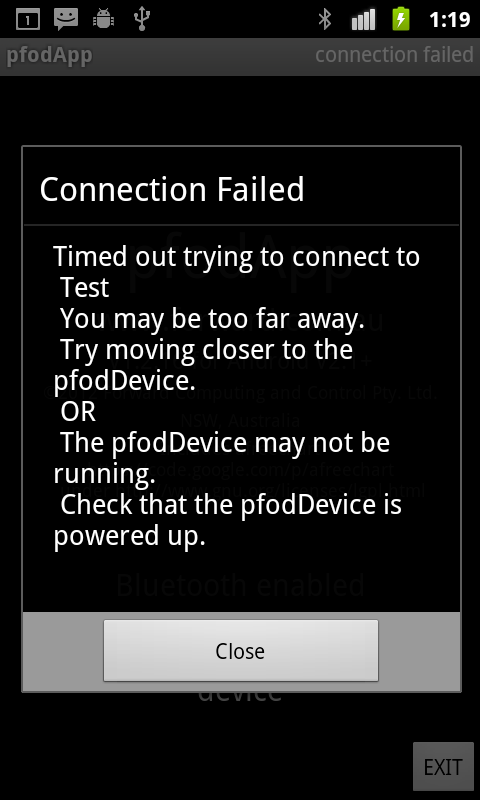
If you see this message, you need to fix this first before continuing. Either your bluetooth device is not powered up, is too far away or is no longer paired with your mobile or you selected the wrong bluetooth when you set up the plodApp connection. See the instructions in pfodAppForAndroidGettingStarted.pdf for how to edit the pfodApp connections.
Once pfodApp has
connected to your bluetooth module, the pfodApp on your mobile sends
the three chars, {.} ,to request the pfodDevice's (Arduino)
main menu. While it is waiting for a response message, the pfodApp
displays the screen.
If all is well then
pfodApp will display this single menu item screen and you can move on
the next section.
If there is no response,
then the connection will time out and display this message
The
default time out is 1 seconds (1000 mS) and is set in the connection
set up screen.
If you see the above
“Connection Timeout”, it means one of three things:-
a)
the Arduino code is not communicating to your bluetooth module or
b)
the sketch code is not recognizing the pfodApp main menu request {.}
or
c) the sketch code is not send back it main menu message,
(enclosed in { }).
Since you download one of the test sketches in step 1. a) is the most likely problem, so that will be considered next.
The bluetooth module needs at least 4 things to work correctly:-
The bluetooth module needs to be powered. Most bluetooth chips are 3.3V so if your Arduino board is a 5V board, check that your module has the extra circuits needed to be connected to a 5V supply and be driven by 5V TX/RX pins. If your Arduino board is 3.3V, check your bluetooth module will work with 3.3V supply and 3.3V on the TX/RX pins.
The TX pin on the bluetooth module must be connected to the RX (pin D0 for most boards) on the Arduino and the RX pin on the bluetooth module must be connected to the TX (pin D1 for most boards) on the Arduino board. Getting these connections wrong may damage your Arduino or bluetooth module. (Note for Due, Mega ADK or Mega2560, connect to the other digital pins that you are using for Tx/Rx)
The bluetooth CTS pin should be connected to the RTS pin. This lets the module send and receive data if it is set for hardware handshaking as many of the bluetooth modules are. If your bluetooth is not set for hardware handshaking you can still connect these two pins.
The bluetooth module board rate must match the setting in the Serial.begin(...) or Serial1.begin(...) statement. Common values are 9600 and 115200. Check your module's documentation to see what its default baud rate is.
For Uno the easiest module to use is the Bluetooth Shield V2.1 -- http://imall.iteadstudio.com/im120417006.html See the UnoStarter Rev0 project for details on how to set it up.
I also use Roving Network (RN) modules as they are reliable and easy to set up. For Roving Networks BlueSMiRF and similar see the SparkFun's tutorial https://learn.sparkfun.com/tutorials/using-the-bluesmirf/introduction
Some of the cheaper (non-RN) bluetooth modules need to be configured every time they are powered up. Check your module's documentation.
Before you continue you must verify that your Arduino board is communicating with your bluetooth module. A failure in this communication is the most common problem.
If some simple checks of the above points does not solve your connection problem, then you should check your bluetooth module's configuration. This will also confirm you can communicate with the module at the correct baud rate.
If
you are using Bluetooth
Shield V2.1 -- http://imall.iteadstudio.com/im120417006.html
as described in the UnoStarter
project, then you only have to
a) remove the shield and
program the Arduino board with an empty sketch
b) switch the To
Board / To FT232
switch
to the To
FT232
position
and plug the board back in.
Then you can use the IDE's Serial
Monitor to talk directly to the bluetooth shield.
Follow the
instructions at RN-42
Settings (do
not
load
the sketch on that page) to set the baud rate and check the
configuration.
If you are using a board that uses Serial1 such as Leonardo,Yun , Micro or FioV3 or Due, Mega ADK or Mega2560 then load the sketch shown in Configuring the RN-42 bluetooth module and the follow RN-42 Settings to set the baud rate and check the configuration.
For those boards that use Serial to communicate with the bluetooth module, such as Uno, Ethernet , Nano, Pro-Mini, Mini or Fio, (not FioV3), if you are not using the shield mentioned above, you need to temporally move the module to another set of pins and use the SoftwareSerial library to check it configuration as described in SparkFuns tutorial https://learn.sparkfun.com/tutorials/using-the-bluesmirf/introduction
In all cases at the end
of the process you should be satisfied that
i) you can
communicate with your bluetooth module,
ii) the baud rate is
correctly set (9600 recommended)
then you can now go back to the
top of this page and follow the steps to connect and display the
“Success” screen on your pfodApp.
At the start of this section you have completed Section 1, and have been able to connect to your Android/bluetooth and get the “Success” screen displayed on your mobile. This confirms all the hardware is working. This next section discusses how to fault find your own sketch.
Re-program your Arduino board with your own sketch that you are wanting to use. (Remove the bluetooth module while re-programming).
Start the pfodApp and connect to your bluetooth connection (this is the same connection as was used in Section 1, called Test). You can edit the connection to rename it. See the instructions in pfodAppForAndroidGettingStarted.pdf for how to edit the pfodApp connections.
If the connection timesout with this screen
Then either:-
a) the Arduino code is not
communicating to your bluetooth module or
b) the sketch code is
not recognizing the pfodApp main menu request {.} or
c) the sketch
code is not send back it main menu message, (enclosed in { }).
If you did not complete Section 1 above, go back and do it now to check that a) is not your problem.
That leaves b) and c) as possible problems. The simplest approach is to either, start with the example sketch you used in Section 1 and modify in a little bit at a time until is does what you want OR add debugging Serial print statements to your own sketch to see what it is doing.
If your Arduino board is using Serial to connect to bluetooth module, you can remove the module and use the Arduino IDE Serial Monitor to test your sketch. Program your sketch and then send the getMainMenu command, {.} and see what you sketch responds with and what debug statements are printed. Correct the code until you get back the main menu you want. The main menu must be enclosed in { }. See the pfodSpecification for examples.
If you Arduino board is using another Serial connection, such as Serial1, then you can either send your debugging print statement to Serial, and monitor them from the IDE Serial Monitor, OR you can send them to Serial1 and look at them on your mobile in the Debug View screen, accessible from your mobile's menu after you close the Timeout Screen.

where they will be displayed together with any pfod
messages your sketch is sending. Here is an example of the Debug
View
As
this Debug View shows, the pfodApp on your mobile sent the request
for the pfodDevice's main menu, {.} BUT nothing came back so the
connection timed out.
In the Debug View < means a pfod message
sent by your mobile while > means a pfod message received by your
mobile. Lines without either a < or > are not valid pfod
messages, just data sent by the pfodDevice.
As noted above are some common reasons for the pfodDevice not responding to the request for its main menu.
Do Section 1 above to solve this problem.
When the pfodApp sends {.}, code in your micro has to parse this to find the . command and then respond with the pfodDevice's main menu. If it does not respond the pfodApp will timeout. Section 1 has complete code examples the include a parser. There are also a number of pfod message parsers available as libraries for Arduino, For Atmel micros a simple assembler parse can be found here, see the PROCESS_RECEIVED_CHAR section.
You can check this by looking the pfodApp Debug View.
Check the pfodSpecification for the valid messages a pfodDevice and send. You can check in the Debug View where you will see the message BUT without a leading >. You can also check in the Raw Data screen which shows all the data from the pfodDevice that was NOT a valid pfod message.
For
example if you pfodDevice sends back the invalid pfod message
{a
test screen}
the
Debug View would show
Note
there is no > in front to the response
and the raw data screen
would show

Only
'data' is shown on the Raw Data screen. Valid pfod messages are never
shown here.
Finally at the end of your command processing code handle all unknown commands by just returning an empty message { } as shown in the code below. If your code does not respond to every message from the pfodApp running on your mobile then the connection will timeout.
  if (Serial.available()) {
    in = Serial.read();
    cmd = parse(in);
    if (cmd != 0) {
      if (cmd == ((byte)'.')) {
        // send main menu
        sendMainMenu();
      } else if (cmd == . . . .
        // handle other commands here
      } else {
        // this should never happen
        // not a command I was expecting
        Serial.println("{}"); // ALWAYS send back a response.
      }
      cmd = 0; // have processed this cmd now
      // so clear it and wait for next one
    }
    // else no cmd yet keep looping
} Finally, if all else fails, send us an email, via contact at the top of this page, and tell us what steps you have tried and the results where.
The General Purpose Android/Arduino Control App.
pfodDevice™ and pfodApp™ are trade marks of Forward Computing and Control Pty. Ltd.

Contact Forward Computing and Control by
©Copyright 1996-2020 Forward Computing and Control Pty. Ltd.
ACN 003 669 994