
|
Home
| pfodApps/pfodDevices
| WebStringTemplates
| Java/J2EE
| Unix
| Torches
| Superannuation
|
| About
Us
|
|
|
A Simple WiFi/Arduino pfodDevice™
|
by Matthew Ford 28th June 2013
©
Forward Computing and Control Pty. Ltd. NSW Australia
All rights
reserved.
This page needs to be updated for pfodParser library V2
This page describes how to get the SimpleWifi_withSecurity.ino Arduino sketch running on a Fio V3 with a RN wifly (Xbee format) module. The pfodSecurity part of the pfodParser library provides connections with 128 bit security. See Challenge and Response Security for Internet connected pfodDevices for the details on how the security is provided.

Fio V3 Arduino compatible board – www.sparkfun.com part no. DEV-11520
RN-XV WiFly Module with Wire Antenna – www.sparkfun.com part no. WRL-10822
MicroUSB – www.sparkfun.com part no. CAB-10215
pfodApp for Android mobiles – see www.pfod.com.au for app store links.
Before you can make a connection to the Fio V3 / Wifly boards you need to configure the WiFi network access and ip and port addresses. Configuring the RN-XV wifi module gives detailed instructions on how to do this. Follow those instructions and once you are finished you should be able to connect from your computer via TeraTerm for Windows (http://ttssh2.sourceforge.jp) or CoolTerm for Mac (freeware.the-meiers.org), by connecting to the host ip and port number you configured. In my case I configured the Wifly board as 10.1.1.100:4989.
Download the pfodParser.zip file and install it following the instructions on that page. Stop and restart the arduino IDE and under File->Examples you should now see pfodParser. Here we are going to run the example file SimpleWifi_withSecurity.ino under File->Examples->pfodParser.
The top two lines of SimpleWifiWithSecurity.ino include the pfodSecurity header and defines a parser
#include "EEPROM.h" // include the EEPROM library
#include "pfodSecurity.h" // include the library
pfodSecurity parser; // define a parser
The first two lines of setup()
Serial1.begin(9600);
Serial.begin(9600);
initialize the two serial ports on Fio V3. Serial is the USB serial connection. Serial1 is the serial connection to the Wifly board.
The next few lines just add a 5sec delay to the startup to give you a chance to open the Arduion IDE serial monitor after uploading the sketch and make programming more reliable.
for (int i = 5; i>0; i--) {
delay(1000);
  Serial.print(F(" "));
  Serial.print(i);
}
Serial.println();
The next line sets D2 as an output
pinMode(D2,OUTPUT);The next line is the important one, it connects the I/O Stream to the parser
parser.connect(&Serial1,F("")); // start with no password to just test the connection
This tell the parse to read/write to Serial1 to receive and send
messages to the pfodApp via the Wifly, use the default EEPROM address
of 0 to store the power cycles and password, and sets the password,
in this example there is no password.
NOTE: The password is read
from program memory. The F(“ “) says this string is in
program memory not in RAM.
The next method, void
closeConnection(Stream *io), is very
important to the security of the system. If an attacker try to make a
connection, not knowing the correct hash response, your code needs to
be able to disconnect them. Also if an attacker takes over you
connection after you have connected and tries to send a command,
without the correct hash, again you code needs to be able to
disconnect them.
How this is done depends on the wifi module you are using. For the RN Wifly module you can disconnect by not sending anything for >250mS the send $$$ and then wait >250mS then send close and exit. The module should send back EXIT. This code just keeps trying until a successful disconnect is achieved.
In the main loop() the parser is called every loop
cmd = parser.parse(); // do the parser stuff reading from Serial1 the wifi connectionwhen it is called it reads any available bytes from the wifi input stream (as set by parser.connect() ) and parses them looking for a complete pfod message with the correct hash. Until a message is found this call returns 0. When a correct msg is found it returns the first character of the command. If the message hash is not correct or no messages have been received for the timeout time or a connection was attempted with an invalid hash, then the character ! is returned.
As the code illustrates, if the return is ! you must disconnect the link by calling closeConnection() and for a new connection.
If the return from parser.parse() is non-zero and not !, process the command. '.' request the main menu. '1' toggles the D2 output. All other cmds are just ignored by returns an empty msg, {} .
As noted above this example code does not have a password, so there is no security for connections and no hashes are generated or checked for each message. This is not recommended, but useful to do initial checks of the connection.
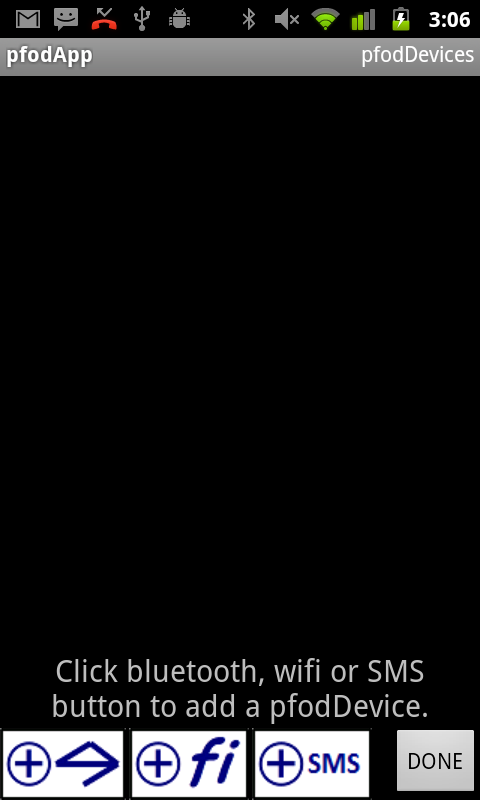
Open the pfodApp and click on the add wifi connection button (+fi)
On the new wifi connection screen enter the host name or ip and port, leave the password blank, press 'enter' to move onto the next input. Leave the timeout as 10sec This is the time allowed for the pfodDevice to respond to a command. Press the save button.

The new connection now show up on the connections list.

Click it to connect.
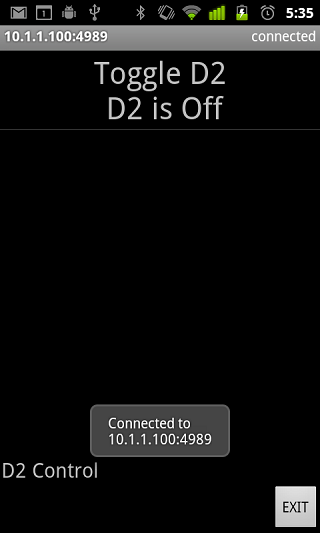
You can not toggle output D2 on and off by clicking the “Toggle D2” buttton. Each time you do that a command, {1}, is sent to the pfodDevice and it toggles D2 and sends back an update to the displayed menu. The number of menu items and the commands associated with them are completely controlled by the text you code in you Arduino sketch.
You can see all the message buy opening the Debug View, from the option menu.

The Debug View shows all the traffic to and from the pfodDevice.

You can see the, {1}, commands sent by pfodApp to the pfodDevice and the updates {: send back by the pfodDevice.
As mentioned above, you should set a password for your pfodDevice to protect it against hackers finding the port and taking control. For maximum security the password should be a 'random' 128 bits, i.e. 32 hex digits long. (If you use a shorter one, pfodSecurity will just append zeros to pad it out.)
It is important that a hacker cannot guess the password, so the password should be 'random' as far as you are concerned.
To help you generate 'random' password there is a Secret Key Generator java program available, see that web page for how to download and run it. Each time you click Generate Key you will get a different 128 bit as 32 hex digits.

Copy and past the password hex digits into the parser init() method call in your sketch
parser.connect(&Serial1,F("173057F7A706AF9BBE65D51122A14CEE")); // add a real passwordBut how to get these 32 hex digits into your mobile?
The Key Generator can also save the password as a QR code image. The filename is the password.

You can print this out and attach it to your pfodDevice and then delete the file. (You can easily generate another password if you need to.) You can then use a QR reader on your mobile, for example QR Droid Private, to read in into you mobile. Then copy it to your connection password.
Press and hold the connection to open the edit panel, then press and hold the password field to open the paste in the password.

Only the first line of text is taken.

Press Save to save these this change.
In the Arduino IDE, recompile and upload the sketch with the password added to the Fio V3/Wifly. Then (after 5secs) click the 10.1.1.100:4989 connection in the pfodApp to connect again.
The screen looks just as before with the “Toggle D2” button. Press it a few times, then open the Debug View.

Here you can see it is quite different. There is an initial challenge and response before the main menu command, {.} and each message has a hash code appended to it. Both the pfodApp and the pfodSecurity on the pfodDevice check the hash code of every message. The long hash messages at the top provide the security against a hacker just logging on and operation your device and per message hashes provide protection against an attacker hijacking your connection after you logon. The per message hashes also protect against a hacker intercepting the messages and modifying them. If any of these hash checks fail the connection is dropped.
AndroidTM is a trademark of Google Inc. For use of the Arduino name see http://arduino.cc/en/Main/FAQ
The General Purpose Android/Arduino Control App.
pfodDevice™ and pfodApp™ are trade marks of Forward Computing and Control Pty. Ltd.

Contact Forward Computing and Control by
©Copyright 1996-2020 Forward Computing and Control Pty. Ltd.
ACN 003 669 994