
|
Home
| pfodApps/pfodDevices
| WebStringTemplates
| Java/J2EE
| Unix
| Torches
| Superannuation
|
| About
Us
|
|
|
Combined IR / TypeK Temperature Meter with Data Logging and Plotting
|
by Matthew Ford 9th September 2013
(original 9th September 2013)
© Forward Computing
and Control Pty. Ltd. NSW Australia
All rights reserved.
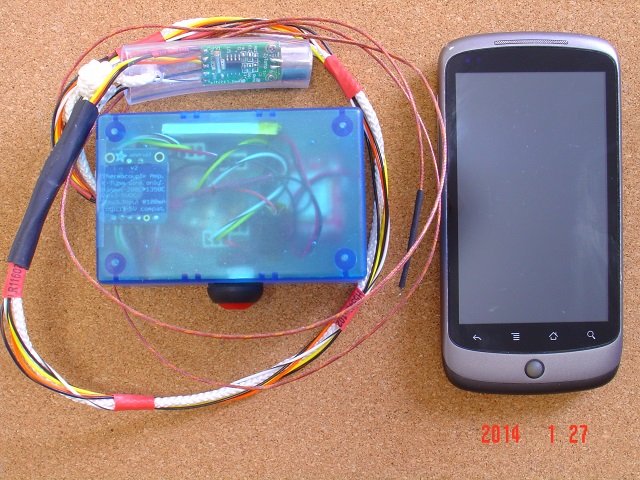


These pages describe an extension of the IRTemp Meter. This extension adds a Type K thermocouple, plotting and a lithium ion battery recharged via USB. The result is a very portable and versatile Temperature Meter
This project uses a freetronics IR Temperature module which can measure temperatures in the range -33°C to 220°C (-27°F to 428°F) and an Adafruit Type K Thermocouple board which can measure temperatures from -200°C to 1350°C (-328°F to 2462°F). Unlike other IR temperature modules the freetronics IR Temperature module comes complete with a metal reflector 'lens' that provides a 53deg measurement angle. I have not found non-Australian supplier of this module but fortunately freetronics has an overseas shipping option.
The IR module is a non-contact temperature measurement, but averages the temperature over its field of view, while the Type K thermocouple has larger range but must be have good thermal contact to the a reliable reading. This project is battery powered so the Type K thermocouple can be grounded without causing problem.
An FioV3 board is used as the arduino and can be fitted with either a bluetooth or wifi module to connect to the Android pfodApp which displays the readings, controls the averaging and plots and logs the results.
The FioV3 incorporate a Lithium Ion battery and charger. The unit is turned on by pressing the power button after which is remain powered up as long as there is a connection from the pfodApp. 60sec after disconnection from the pfodApp, the IR/Type K Temperature Module powers down completely (<1uA).
The project makes some modifications the standard FioV3 board to correct some design problems.
Download pfodApp to your Android phone. The one pfodApp will run all your pfodDevices. Follow the pfodAppforAndroidGettingStarted.pdf instructions to set up a connection to your IR/Type K temperature module. Then press the power button on the IR/Type K temperature module to power it up and then connect to it using the pfodApp within 60 sec. By default the module will remain powered up as long as it is connected and for 60 sec after disconnection.
The main menu shows you the IR and Type K temperature readings and allows you to select Fahrenheit or Celsius readings. You can also choose the number of IR reading to average for the display and you can plot either the IR or Type K readings, or both. The readings in CSV format are save to a file in your Android mobile. Later you can download the data to your computer, see pfodAppforAndroidGettingStarted.pdf for details.
The pfodApp used here is a general purpose Android application for displaying menus, handling user input and and plotting and saving data via bluetooth, wifi and SMS. See pfodSpecification.pdf for all the details.
The construction is a little tricky. It involves removing some surface mount components from the FioV3 board and making up a daughter board with some small surface mount fets and resistors.
As delivered the FioV3
board has a number of problems. The two ones that need fixing
here are
a) over charging the battery when USB is connected and
the FioV3 board mounted on/off switch is turned on and
b) the
discharging of the battery by the on board voltage monitoring divider
(R14/R15) which is remains connected to the battery even when the
board mounted on/off switch is off.
Warning:
Do not run the standard Arduino BLINK example code, or any other code
using pin 13 (LED) as an output, on the Fio V3 board when a battery
is connected. You may damage the board.
The circuit below shows the resistor to be removed,
the switch to be removed, the jumper to be cut and the diode,
MBR129VSOD123, to be added. The diode allows the board to be powered
via the USB while preventing the battery feeding back to the USB
circuit when battery powered.
The photo below show the FioV3 board modified as above.


Removing surface mount components is tricky. I use ChipQuik Removal Alloy, but the SMD removal kit looks like a cheaper alternative for this job.
In addition to these FioV3 board mods, you need to build a daughter board to hold the fets controlling battery power and the new battery voltage monitor divider. Here is the complete circuit of the FioV3 plus the battery supply modifications. Components U$7, U$5, U$8, R4, R17, R16, R18, R19 are mounted on the daughter board. This daughter board should really be a PCB, but for this project I just used a small piece of vero board.


Half inch internal diameter clear plastic tubing pushed over the sensor makes a suitable mounting. (Note: Do the wiring first, the tubing does not come off once pushed on.)
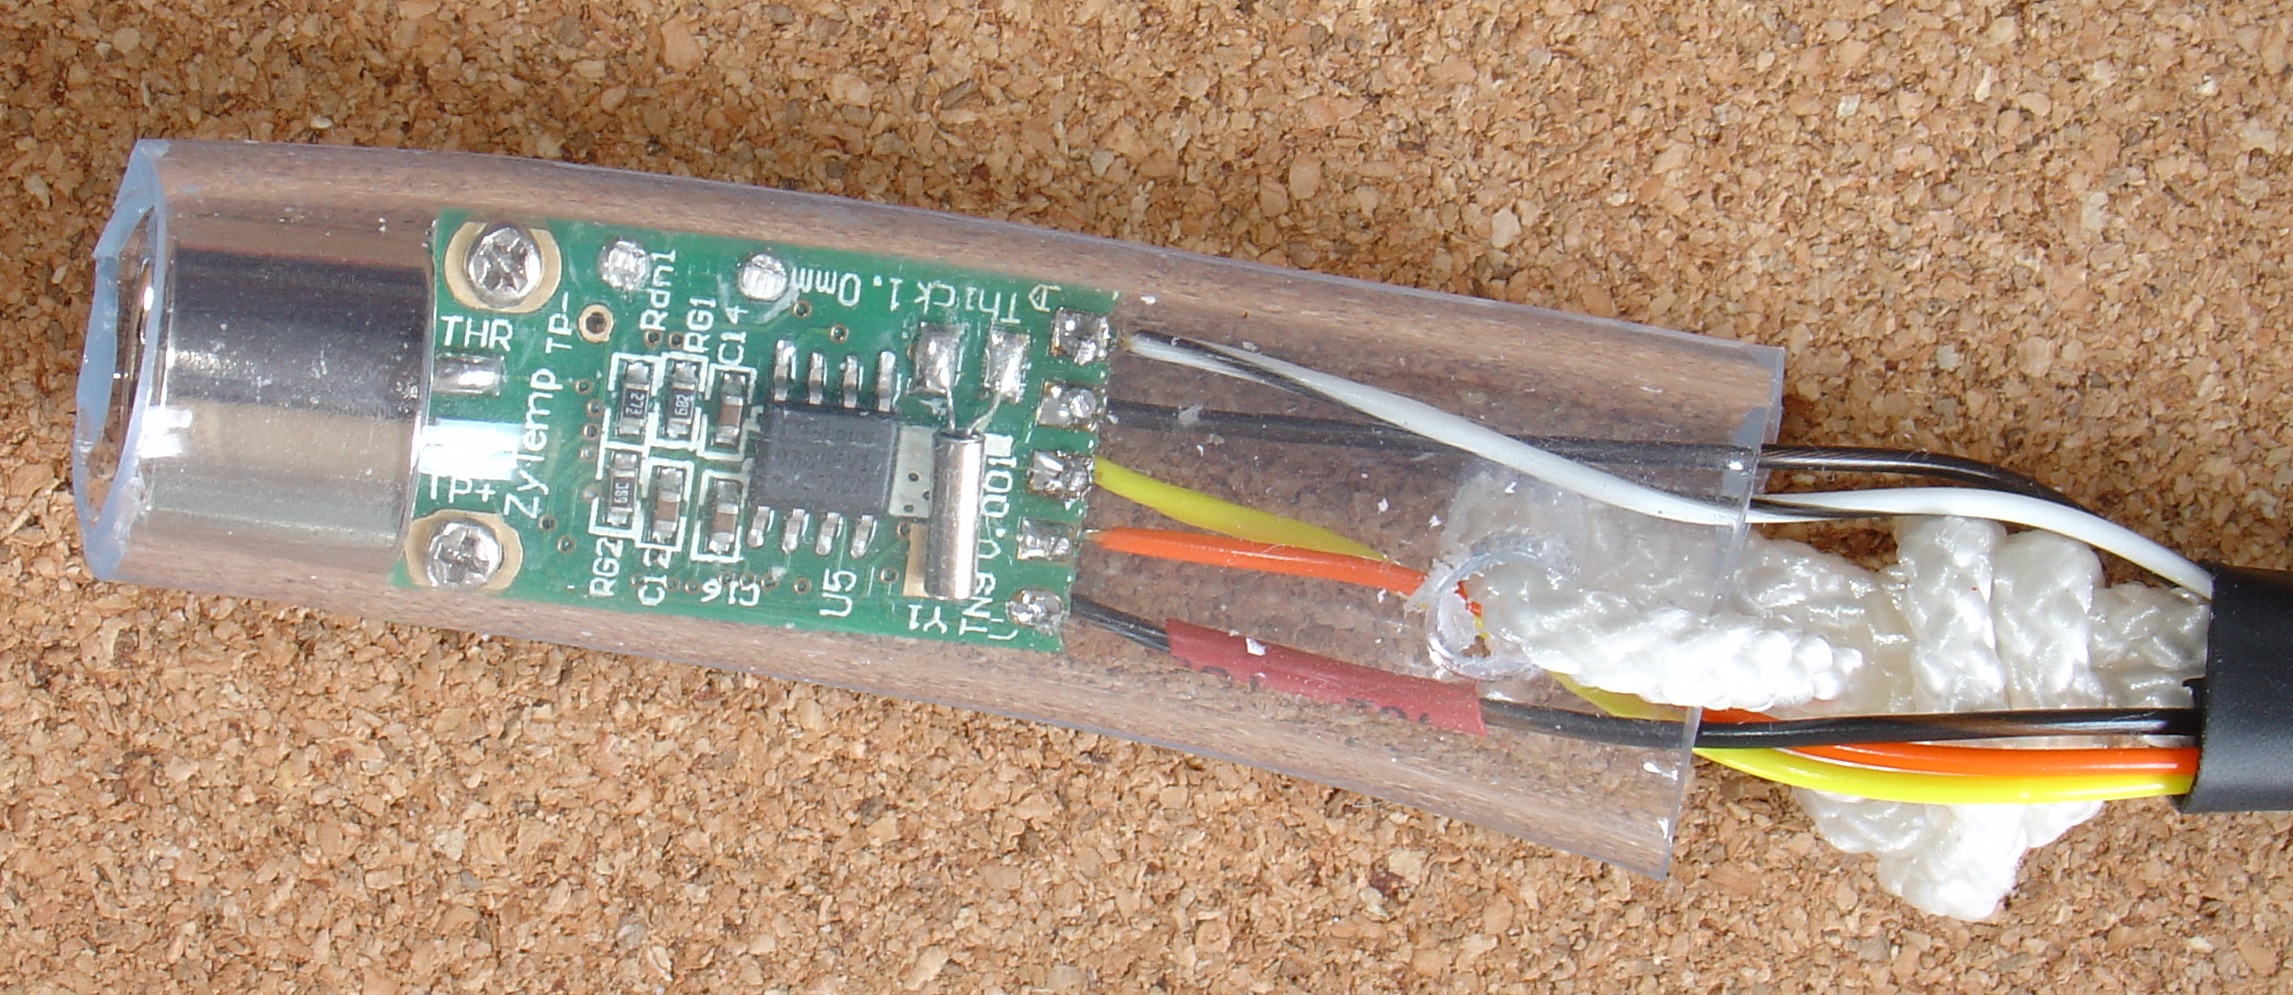 (click for full size image)
For the sensor wires, 26 AWG Teflon insulated wires provides a very tough and heat resistant connection. (See the parts list for a source of Teflon wire.) A nylon cord attached to the plastic tubing, provides strain relief. Teflon insulated wire is very hard to strip without cutting the strands of wires. The recommended method is to use a wire stripper, like the one listed in the parts list and close the wire stripper on the wire then open and remove the wire stripper and pull the cut insulation off by hand. Using the wire stripper to pull off the insulation tends to cut the wire.
The IR Sensor is wired as follows:-

V (VCC) connected to FioV3 3.3V.
G (GND) connected
to FioV3 GND.
D (Data) connected to FioV3 digital pin D2.
C
(Clock) connected to FioV3 digital pin D3.
A (Acquire) connected
to FioV3 digital pin D4.
I also added 300Ohm resistors in the Data and Clock leads. This protects against damage if D2 or D3 is accidentally programmed as outputs. I used a 2 pin header for power and a 3 pin header for data to connect to this module
The Type K thermocouple module is wired as follows:-

Vin
(VCC) connected to FioV3 3.3V.
3Vo - no connection.
G (GND)
connected to FioV3 GND.
DO (Data) connected to FioV3 pin A5. (A5
used as Digital Input)
CS (Select) connected to FioV3 pin A4. (A4
used as Digital Output)
CLK (Clock) connected to FioV3 pin A3. (A3
used as Digital Output)
Here I am using the Analog input pins as standard Digital I/O pins. Again I added 300Ohm resistor in series with the DO lead to protect against damage due to programming errors. I used a 3 pin header for power and 4 pin header for data for this module. I cut off the data pin not used. Using different sized headers allows easy identification of which sensor plugs where.
The FioV3 board and the daughter board are attached to the lid of the plastic case with plastic screws (3mm x ). Spaces are used between the lid the FioV3 and nuts are used to space the daughter board from the FioV3 board.

In the body of the case is mounted the momentary push button and the thermocouple module and the Lithium Ion battery. The thermocouple module and the Lithium Ion battery are mounted using double sided tape (Scotch Permanent Clear Mounting Tape)

Note:
There is a cut out in the case on the right hand side (above) to
allow the USB cable to be plugged in to the FioV3 board for
recharging the battery (and programming) once the case is fully
assembled.
To compile the software for this combined IR and Type K thermocouple module you need to first install three (3) libraries. The pfodIRTemp library for the IR temperature sensor, the pfodMAX31855 library for the Adafruit type K thermocouple module, the pollingAnalogRead library for the battery voltage monitoring. After installing these 3 libraries you can compile the CombinedIRTypeK.ino sketch.
Freetronics and Adafruit supply libraries for the IR sensor and the type K thermocouple module, respectively. However these libraries use wait loops and delays to collect the readings, although the delays in the Ardafruit type K thermocouple library are small. Using these libraries would block the FioV3 from handling pfod commands and sending replies whenever a temperature reading was being made.
To overcome this and to keep the FioV3 responsive to bluetooth/wifi communications I wrote new libraries that avoided using wait loops and delays.
As noted above the FioV3 board includes a built in battery charger. The code for this module also includes a battery voltage monitor so that you are alerted when the module needs to be plugged in to the USB to recharge the battery. Reading the battery voltage requires an A/D conversion but the AnalogRead() method provided by the standard Arduino code has two failings. One it blocks the main loop whenever an AnalogRead() is taking place typically 15 to 22mS delay for each AnalogRead(). The second failing is that the standard Arduino library does not discard the first result after the reference voltage has changed, as recommended by the Atmel datasheets for the micro-processors used by Arduino. The pollingAnalogRead library solves both those problems and is used by this software.
The reference voltage for the ADC has wide tolerance (+/- 10%), so the battery voltage measurement needs to be calibrated. In my case I measured 4.14V for 586 counts, i.e. counts * 0.0071 == volts so a cutoff voltage of 3.6V = 510 counts. Below this the menu will display “Recharge Now”
AndroidTM is a trademark of Google Inc. For use of the Arduino name see http://arduino.cc/en/Main/FAQ
The General Purpose Android/Arduino Control App.
pfodDevice™ and pfodApp™ are trade marks of Forward Computing and Control Pty. Ltd.

Contact Forward Computing and Control by
©Copyright 1996-2020 Forward Computing and Control Pty. Ltd.
ACN 003 669 994