
|
Home
| pfodApps/pfodDevices
| WebStringTemplates
| Java/J2EE
| Unix
| Torches
| Superannuation
|
| About
Us
|
|
|
ESP32 Code Generator for pfodApp™
|
by Matthew Ford 25th November 2022 (originally posted
26th April 2018)
© Forward Computing and Control
Pty. Ltd. NSW Australia
All rights reserved.

The latest versions of
the ESP32 V2.0.0 – V2.0.5 Arduino board support have problems
with WiFi connections for the ESP32 chip (e.g. Sparkfun ESP32 Thing,
tec). Roll back to ESP32 V1.0.6 for reliable pfodApp WiFi
connections.
Use latest versions V2.0.4+ for ESP32 BLE and
Bluetooth connections and for ESP32C3 (different chip) WiFi.
For
ESP8266 V3.0.2 works.
ESP32 is a low cost dual processor chip, with support for WiFi, Bluetooth Classic and BLE (Bluetooth Low Energy). Although the chip has been out for a number of years, code support for Arduino is still not complete (as at April 2018), but this tutorial and code generator fills in the missing BLE and analogWrite functions.
This web page will cover setting up the Arduino IDE to program the ESP32 for BLE, Bluetooth or WiFi connections. The pfodDesigner generates code for each of these connection types and also generates code to simulate the missing analogWrite function.
The Arduino add-on supports some 31 ESP32 boards. When using the pfodDesigner, you will need choose pin connections that match those available on your particular board. The Sparkfun ESP32 Thing (or Adafruit HUZZAH32 Feather) is used here as the example ESP32 board, but you can use the code for any of the 31 supported ESP32 boards.
The free pfodDesignerV3 Android app is used to create the control menu (WYSIWYG) and then generate the code for the ESP32, either for a BLE, WiFi or Bluetooth connection. Having programmed your ESP32 board you can then use the pfodApp Android app (paid) to connect to your ESP32 (via BLE or WiFi or Bluetooth) and display your control menu and control your ESP32. If you don't want to use pfodApp, you can still use the generated coded as a basis for your own WiFi, BLE (Nordic UART) or Bluetooth connections as it provides a Stream (print/read) interface to each of these connection types.
You can not use the Arduino Board Manager to install the ESP32 support.
Install
the current upstream Arduino IDE at the 1.8 level or later. The
current version is at the Arduino
website.
Start Arduino and open
Preferences window.
Enter the release link into Additional
Board Manager URLs field.
https://raw.githubusercontent.com/espressif/arduino-esp32/gh-pages/package_esp32_index.json
You can add multiple URLs, separating them with commas.
Open
Boards Manager from Tools > Board menu and install esp32
platform (and don't forget to select your ESP32 board from Tools >
Board menu after installation).
Once
this is complete, close and re-open your Arduino IDE and you should
now have a long list of ESP32 boards to choose from under the
Tool->Boards menu.
Choose “SparkFun ESP32 Thing”
(or “Adafruit ESP32 Feather” if you are using that board)
You can then open the File-Examples list to see a number of ESP32 example files.
a) Then download the pfodParser.zip library V3.23+ , pfodDwgControls.zip and, for ESP32 WiFi, the pfodESP32BufferedClient.zip, zip files to your computer, move them to your desktop or some other folder you can easily find.
b) Then use Arduino 1.8.2 IDE menu option Sketch →
Import Library → Add Library to install them.
(If Arduino
does not let you install it because the library already exists then
find and delete the older pfodParser, pfodCmdParser or pfodCHAP etc
folders and then import these ones)
c) Stop and restart the Arduino IDE and under File->Examples you should now see pfodParser, pfodDwgControls and pfodESP32BufferedClient libraries and a number of examples.
The free pfodDesignerV3 (V3861+) app supports generating code for the ESP32 chip to connect via BLE, WiFi or Bluetooth Classic to pfodApp (paid).
There are many existing tutorials on how to create controls for your Android mobile to control a wide range of boards using pfodDesignerV3. With pfodDesignerV3 you can create controls that turn outputs on/off or pulse them, control outputs via PWM, display the state of an input or analog value, log and plot data and sub-menus and much more.
The ESP32 Arduino support includes support for some 31 different ESP32 boards. The pfodDesignerV3 gives you access to all of the ESP32 I/O pins but not all boards connect all of the ESP32 pins to board pins. Check your board's documentation for which pins are made available and see the pins_arduino.h file under your board's hardware\espressif\esp32\variants directory.
pfodDesignerV3 pin list includes comments about availability and special use pins for the Sparkfun ESP32 Thing and Adafruit HUZZAH32 – ESP32 Feather Boards.
These examples use the Sparkfun ESP32 Thing board and creates a slider to control the brightness of the onboard LED connected to pin 5 from your Android mobile. If you are using the Adafruit HUZZAH32 – ESP32 Feather board instead then the onboard Led is connected to pin 13.
The ESP32 Arduino support, installed above, does not support Arduino's analogWrite directly. Instead the ESP32 has 16 PWM channels you can control and connect to any of the outputs. The pfodDesignerV3 generates all the necessary code to allocate the channel and connect it to your chosen output.
Install the free pfodDesignerV3 (V3291+) from google play.

Start a new Menu

Click the Target button to change the target device.

The first example target will be ESP32 BLE so click the Bluetooth Low Energy button.

and select ESP32 connected via BLE and then press the mobile's back button to get back to the main screen.

This simple example will only have a prompt and a single control. Click the Edit Prompt button and then the Edit Prompt Text button to set the prompt text.

Here the prompt is set to “ESP32 Led”. Click the tick button to save you edits and return to the previous screen. Then click the Set Background colour to select the over all colour for the menu of controls.

You can select different colours for each control. There are various other formats available for the prompt. Here the background is set to Blue and the font size is +5 and the text is Bold. A preview of the formatted prompt is shown at the bottom of the Editing Prompt screen.

Use the mobile's back button to return to the main menu and then click Add Menu Item to add a control or display item.

Select the PWM Output item. A preview of the control is shown at the top of the screen.

Click the Edit Leading Text button and change “PWM Setting “ to “Led “ Note the trailing space to separate “Led “ from the % indication.

Click the tick button to save your edit and then scroll down to the “Not connected to an I/O pin” button.

Click that button to display a list of pins that can be used as outputs.
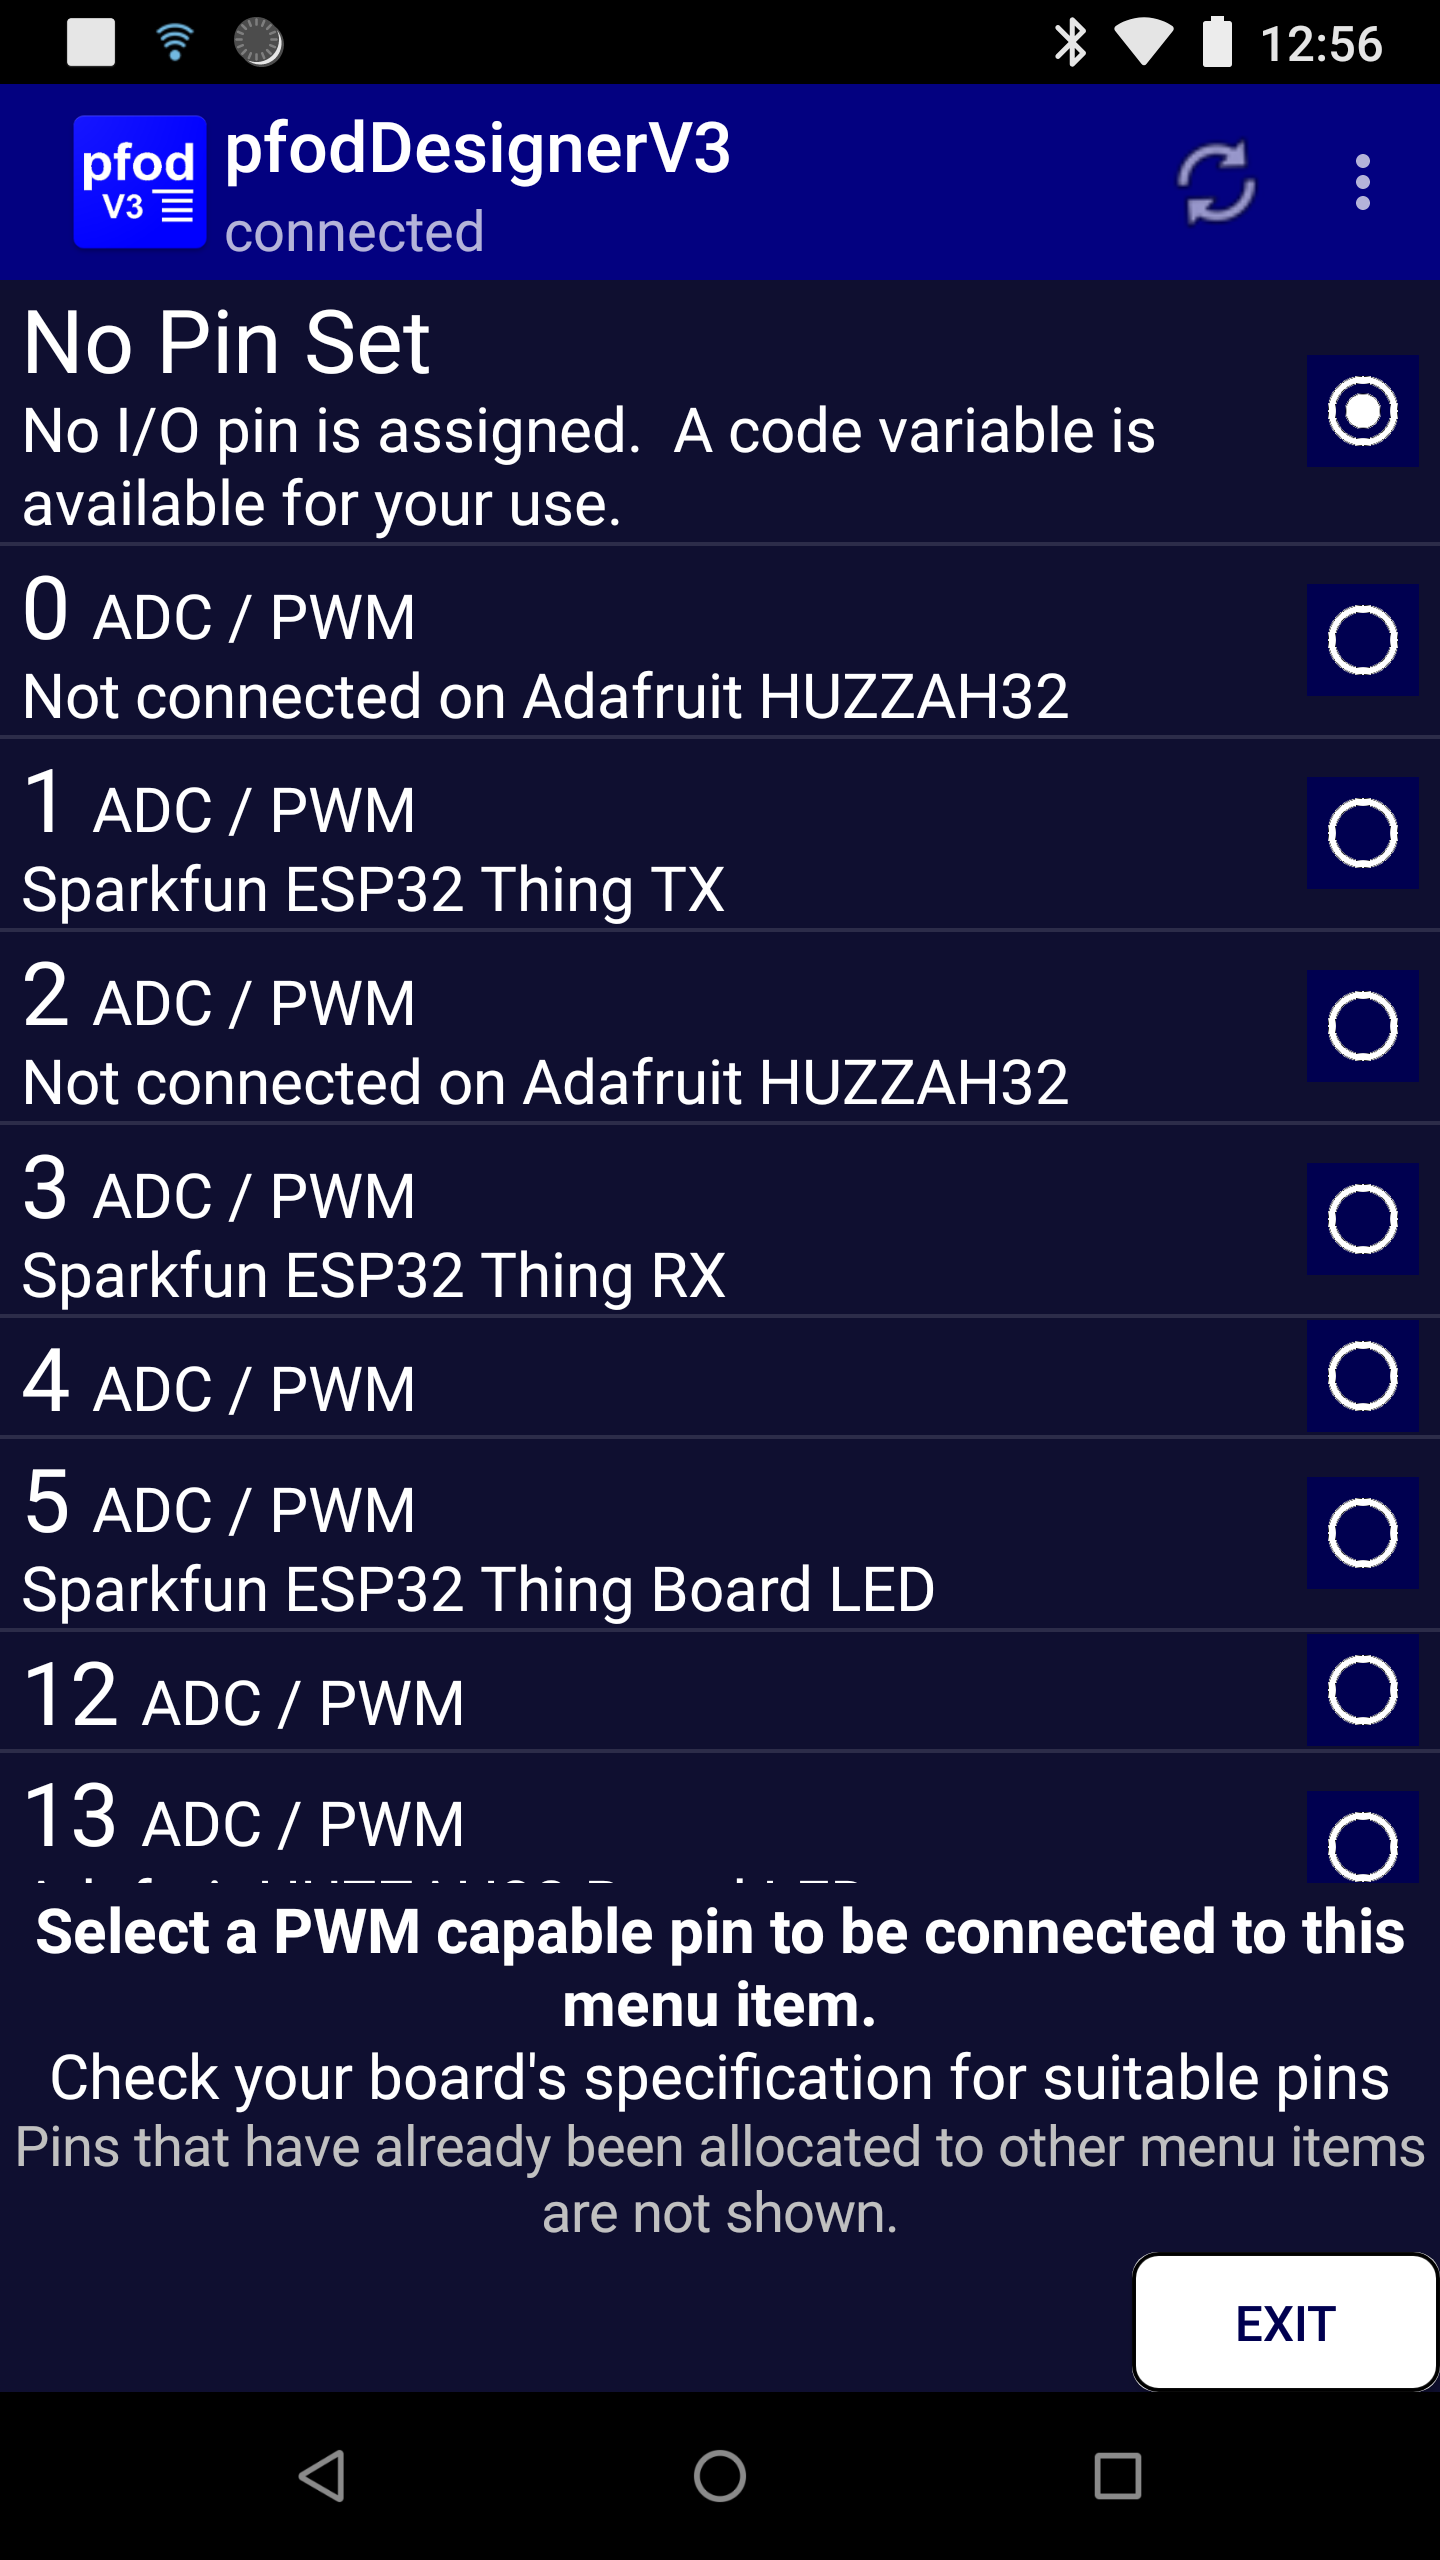
This shows the special use pins for the Sparkfun ESP32 Thing and Adafruit HUZZAH32 Feather boards. Select pin 5 so that the slider control will control the Sparkfun ESP32 Thing's on-board led brightness. If you are using the Adafruit HUZZAH32 Feather board, select pin 13 instead. For other boards check your boards documentation and the pins_arduino.h file under your board's hardware\espressif\esp32\variants directory

Then, when you have finished making any other formatting settings for this slider, use the mobile's back button to go back to the main menu and click Preview Menu to see what the final menu will look like on your mobile when displayed by pfodApp. The controls are live so you can move them in the preview.

Go back to the main menu and scroll down to the Generate Code button.

Click the Generate Code button and then click the Write Code to File button to generate the code

Exit the pfodDesignerV3 and transfer the code in /pfodAppRawData/pfodDesignerV3.txt from your mobile to your computer. See pfodAppForAndroidGettingStarted.pdf for ways to do this. The wifi file transfer pro app by smarterDroid is one way to do the transfer.
Using the “Change Target” button on the Generate Code screen, you can switch between ESP32 via BLE, ESP32 via Bluetooth and ESP32 via WiFi

This is how the following three example sketches were generated from the above design.

Setting the Target to ESP32 via BLE generates the code in pfodESP32_LED_BLE.ino This sketch is also available under File->Examples->pfodParser. Open that example, then, after programming the Sparkfun ESP32 Thing (or other ESP32 board), you should then set up a connection to it on pfodApp (see pfodAppForAndroidGettingStarted.pdf for the details) and connect and be able to adjust the brightness of the board led.
Note: ESP32 uses the same bluetooth address for both BLE and Bluetooth, so if you have previously set up an ESP32 Bluetooth connection in pfodApp, you need to delete that pfodApp Bluetooth connection before setting up a BLE connection, since pfodApp filters existing connections (by address) from the display list of available devices. You may also need to open your mobile's setting and 'forget' the ESP32 Bluetooth connection and then turn off the mobile's Bluetooth and reboot your phone to clear the Bluetooth stack.
Note: The ESP32_BLE_Arduino library from Neil Kolban is not compatible with the BLEPeripheral library from Sandeep Mistry which is used by some other BLE targets generated by pfodDesigner. So you need to remove the BLEPeripheral directory, (if it exists), from your Arduino/libraries directory in order to compile ESP32 BLE sketches.
Setting the Target to ESP32 via Bluetooth generates the code in pfodESP32_LED_Bluetooth.ino This sketch is also available under File->Examples->pfodParser. Open that example, then program the Sparkfun ESP32 Thing (or other ESP32 board). You need to pair the ESP32 with your phone, no pin number required. Then set up a connection to it on pfodApp (see pfodAppForAndroidGettingStarted.pdf for the details) and connect and be able to adjust the brightness of the board led.
Note: ESP32 uses the same bluetooth address for both BLE and Bluetooth, so if you have previously set up an ESP32 BLE connection in pfodApp, you need to delete that pfodApp BLE connection before setting up a Bluetooth connection, since since pfodApp filters existing connections (by address) from the display list of available devices. You may also need to open your mobile's setting and 'forget' the ESP32 Bluetooth connection and then turn off the mobile's Bluetooth and reboot your phone to clear the Bluetooth stack.
Setting the Target to ESP32 via WiFi generates the code in pfodESP32_LED_WiFi.ino This sketch is also available under File->Examples->pfodParser. Open that example and insert your network's name and password and choose a static IP for this device. Then, after programming the Sparkfun ESP32 Thing (or other ESP32 board), you should set up a connection to it on pfodApp (see pfodAppForAndroidGettingStarted.pdf for the details) and connect and be able to adjust the brightness of the board led.
If connecting to the ESP32 via the internet (via wifi), then security is important. You don't want just anyone to be able to open your garage door, for example. The code generator and the pfodParser library supports 128 bit security. This security does not encrypt the messages but instead adds a cryptographic hash to each message to protect against un-authorized connection and control. See SipHash Secure Challenge and Response for details of how this security is implemented.
Securing
against un-authorized users accessing your device over the internet
is a as easy as editing
#define
pfodSecurityCode ""
to
add your own secret code. (up to 32 Hex digits)
For
example to set a security code of 173057F7A706AF9BBE65D51122A14CEE
you would use
#define
pfodSecurityCode "173057F7A706AF9BBE65D51122A14CEE"
Of
course you should use your own secret code. Setting your own code in
your pfodApp connection allows you, and no-one else, to connect.
A long random code is necessary for good security. pfodApp supports up to 128bits as 32Hex digits.
To generate your own secret code can download a random Secret Key Generator from here. As well as generating random keys, this program writes them out as QR codes so you can easily and accurately set them in your pfodApp connection.

You
can print out the QR code and attach it to your pfodDevice. Then
click the Scan QR botton in pfodApp WiFi connection screen to read in
the password.
See A Simple WiFi/Arduino pfodDevice™ with 128 bit security for a detailed example of using the key generator and the QR code.
This tutorial has shown how to set up the Arduino IDE to program the ESP32. It then used the free pfodDesigner app to design a menu to control the brightness of the onboard led and generated code for connecting to the ESP32 via BLE, Bluetooth or WiFi. If you then connect via the pfodApp app you will see the menu you designed and be able to control the led's brightness via a slider. The pfodDesigner generates all the Arduino code, including simulating Arduino's analogWrite. No Arduino coding was required. The pfodApp takes care of all the Android side, no Android coding required.
AndroidTM is a trademark of Google Inc. For use of the Arduino name see http://arduino.cc/en/Main/FAQ
The General Purpose Android/Arduino Control App.
pfodDevice™ and pfodApp™ are trade marks of Forward Computing and Control Pty. Ltd.

Contact Forward Computing and Control by
©Copyright 1996-2020 Forward Computing and Control Pty. Ltd.
ACN 003 669 994