|
Home
| pfodApps/pfodDevices
| WebStringTemplates
| Java/J2EE
| Unix
| Torches
| Superannuation
| CRPS Treatment
|
| About
Us
|
|
|
AI coded Arduino interface to Sensor pfodWeb/pfodWebDesigner GUI
|
by Matthew Ford 1st November 2025 (originally posted 1st November
2025)
© Forward Computing and Control Pty. Ltd. NSW
Australia
All rights reserved.
This tutorial shows the prompts to use to ask Claude AI to write the interface code between a sensor's API and the GUI, created by pfodWebDesigner, that will control it. In this case a DFRobot C4001 mmWave Human Presence Detect sensor is used. The C4001 has 9 adjustments that affect how it detects human presence. pfodWebDesigner is used to create a GUI for these 9 controls as well as buttons used to set the sensor's state and to show if motion has been detected. The end result is three sketches, one connects to the GUI via pfodWeb using Serial, the others by BLE and HTTP. The BLE and HTTP sketches also connect to the Android pfodApp and the HTTP sketch can also connect to any browser (iPhone, Android, PC, Mac etc). The HTTP code runs on ESP32, ESP8266 and Pi Pico W/2W
The Claude AI costs were less than 50 cents.
Here a FireBeetle 2 ESP32-E is used as the microprocessor because the ESP32 supports BLE and HTTP connections as well as the Serial connection. But any Arduino larger than the UNO can be used with the Serial connection.
Install pfodWebDesigner and design the basic controls. A slider, input field and button. Then copy those for each control needed and place them on the GUI.
Generate the Serial version of the GUI Arduino code. Compile and run the sketch to display the GUI via Serial using pfodWeb (included in the Arduino pfodParser library)
Install Claude AI terminal and prepare the files Claude AI will need to reference to code the interface wrapper.
Run Claude AI terminal and use the prompts to ask Claude to add the wrapper file and to complete the pfodWebDesigner generated code.
Wire up the C4001 sensor via IC2, load the sketch to display the completed GUI via Serial with pfodWeb.
Use pfodWebDesigner
to generate the BLE and HTTP versions.
Use pfodWeb
to test the BLE and HTTP versions on an ESP32. pfodApp
can also be used to display the GUI via BLE or Web on an Android
phone.
Any browser can display the HTTP sketch which also runs on
ESP8266 and Pi Pico W/2W.
Dfrobot C4001 mmWave Human Detection Sensor US$12.90
For a pfodDevice to serve your GUI - Arduino
UNO has too little memory for this GUI
FireBeetle
2 ESP32-E with headers US$9.90 or Beetle
ESP32 C3 US$7.90 or other ESP32 board
IO
Shield for FireBeetle 2 US$4.90 to plug the C4001 into.
OR
any other Arduino board with I2C and a serial connection, other than
UNO.
Arduino
IDE V2 (V2.3.6)
ESP32
board support V3.3.2 or other board support as needed for your
board
Libraries
- pfodParser
and SafeString
and DFRobot_C4001
HumanDetection-master libraries – Install via Arduino or
install the libraries.zip
Claude AI terminal here used on Windows 10 via wsl
For the pfodWebDesigner
node,js
from https://nodejs.org/
pfodWebDesigner.zip
pfodWeb is a free web based partial replacement for the paid Android app, pfodApp. pfodWeb runs in a browser and connects to your Arduino board via either Serial or BLE or HTTP. Using Serial you can connect to any Arduino board and display the interactive controls it serves. pfodWeb runs completely off-line. No internet connection is needed. Just install the pfodParser library and open the index.html in the pfodWeb sub-directory. The interactive controls are completely defined by the code (generated by pfodWebDesigner) in your Arduino. Very compact pfod messages are used to send the controls and receive the user's commands.
If your Arduino board supports HTTP and has a file system of 200Kb, then you can load the all pfodWeb files onto your microprocessor and serve them directly from there.
pfodWebDesigner is a free web based replacement for the free Android app, pfodGUIdesigner. pfodWebDesigner allows you to design interactive and responsive user interfaces for your microprocessor. pfodWebDesigner generates Arduino code that works with all pfodDevices that connect via Serial, Bluetooth, BLE, SMS and WiFi, not just those that have WiFi support. See how to install pfodWebDesigner and Using pfodWebDesigner to Create GUI's. Individual pfodWebDesigner controls are stored as JSON files which you can duplicate, modify and reuse in other designs. Each reused control can be individually scaled and positioned in the final design.
Install the free pfodWebDesigner.
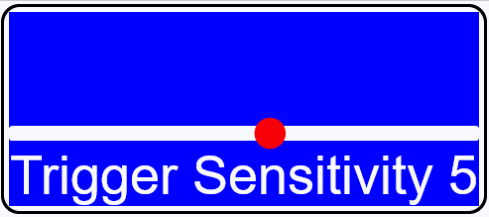
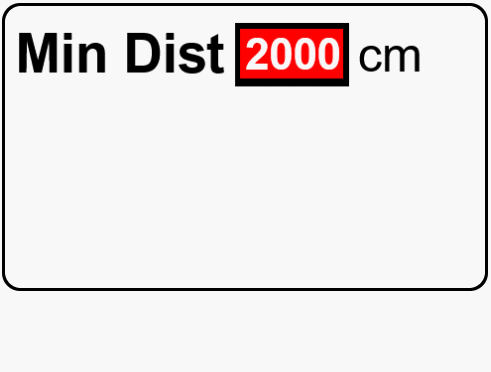
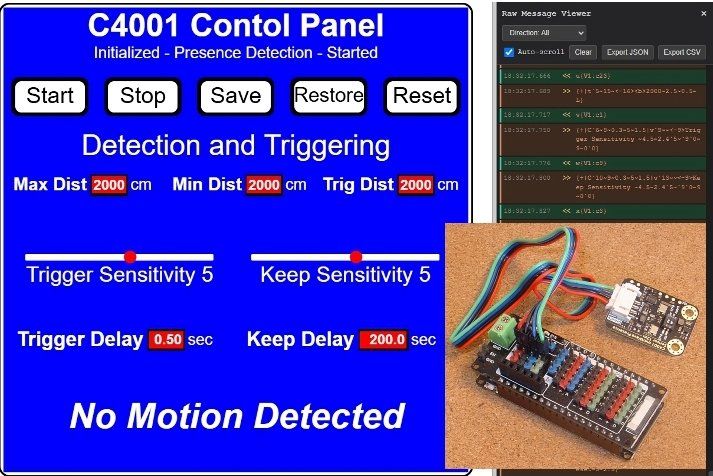
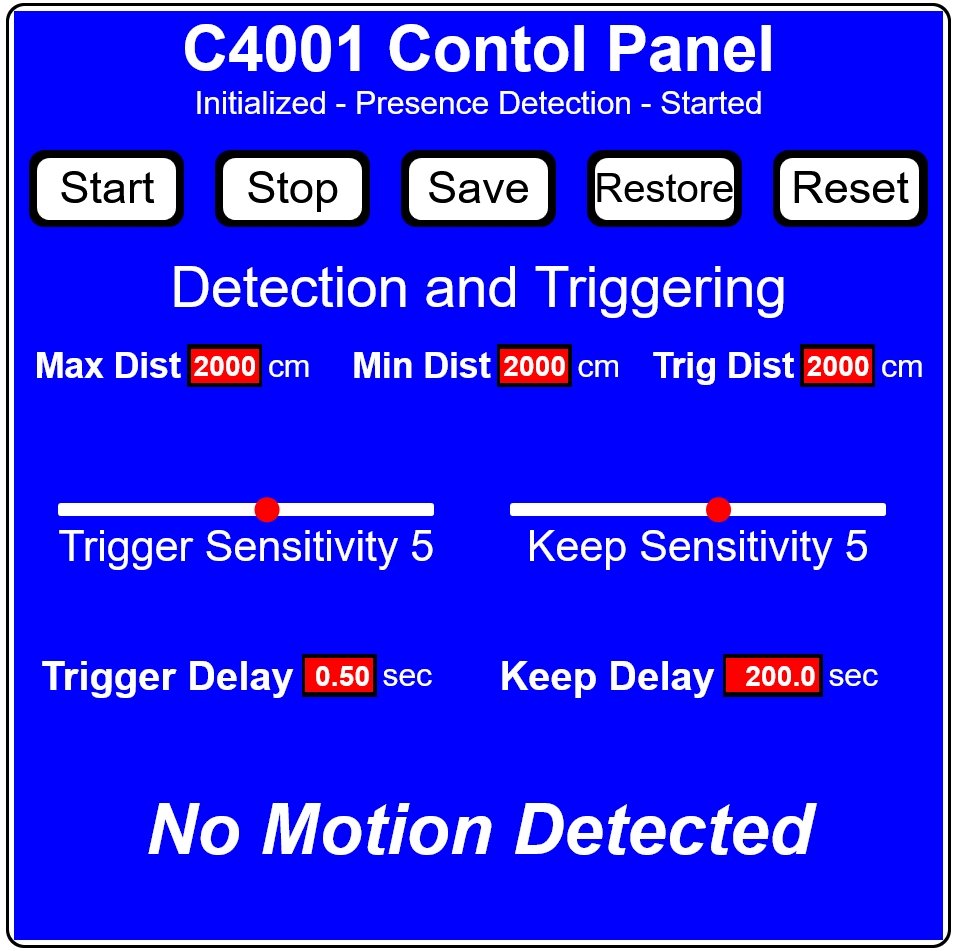
Check the sensor API header file DFRobot_C4001.h for the number and type of controls needed. In this case there are 9 input controls. Seven number inputs. for Distance and Delays. and two slider inputs for Sensitivities. As well as that there are 5 buttons, Start, Stop, Save, Restore (factory defaults) and Reset. So three types of controls are needed, a text input, a slider and a button.
See the pfodWebDesigner tutorial for how you can build you own versions of these controls. Here are the three controls used in this project and their .json design files. Each of them are interactive and respond to the user's mouse actions, immediately without sending any messages to the microprocessor (pfodDevice)
There controls where copied and edited for their respective input and the placed on the C4001 GUI together with the status and motion detected strings.
The complete set of json design
files is in the C4001_json.zip
The refresh for the C4001controls dwg is set at 1second so the
changes in motion detection status are updated quickly.
Once you have completed your
design in pfodWebDesigner, you can export a complete sketch for
connection by Serial, BLE or HTTP. Exporting for Serial generates a
C4001controls_serial.zip (designer_C4001controls_serial.zip)
Unzip (designer) C4001controls_serial.zip
to your Arduino sketch directory and compile and upload it to your
Arduino board. This sketch needs the pfodParser
library to be installed, via the Arduino library manager or via
its zip file.
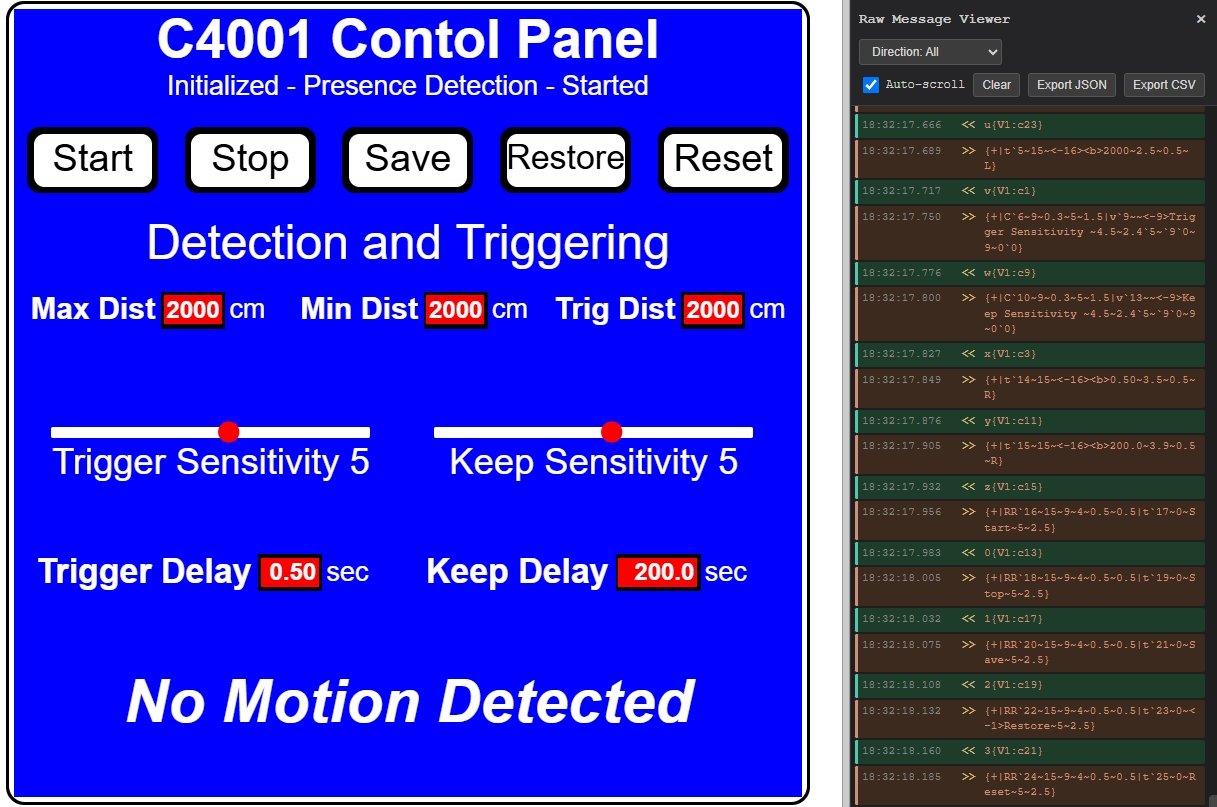
The pfodParser library includes index.html in the pfodWeb sub-directory which lets you start either pfodWeb.html or pfodWebDebug.html. See pfodWeb QuickStart. In order to connect via Serial you need to use a Compatible Browser Chrome (needs setting change), Edge or Opera. Make sure the Arduino Serial Monitor is closed. You can right click on the GUI to open the Raw Message Viewer to see the refresh messages for each control.
Install Claude AI (on Windows needs WSL installed first). Ask Claude Chat if you need more help.
Create a folder for this project and add the following files, GUI screen shot, C4001 header file, SafeString.h and an exampleCode.txt file to give Claude the context needed to code the interface between the C4001 API and the drawing code. Add a suitable CLAUDE.md file for overall instructions.
The SafeString library is used to reliably convert input text to numbers and to prevent char[] overflows when building output strings. See the tutorial for details.
This steps seems to run a little differently every time. Claude is continually being updated and 'improved'. This was the prompt given to Claude.
Context files
------------------
DFRobot_C4001.h
SafeString.h
c4001Screenshot.jpg
C4001controls_serial generated code
exampleCode.txt

c4001Screenshot.jpg shows the user interface drawn by the Dwg_.. methods in sub-dir C4001controls_serial
DFRobot_C4001.h is the API for the presence detector sensor
SafeString.h is the API for SafeStrings
exampleCode.txt contains snippets of example code to use
the sub-dir C4001controls_serial contains the code to be modified

The task is to
i) write a wrapper, placed in sub-dir C4001controls_serial, for DFRobot_C4001.h to provide
string outputs for status and present detected (using motionDetected())
and int outputs for other variables
and setters as illustrated in exampleCode.txt
Note that trig and keep delays are displayed in seconds in the user interface
so they need to be converted from text (a float input) to API units and from API units to float number

ii) update the Dwg_...files in sub-dir C4001controls_serial to
use the wrapper methods for sendIndexedItems() methods
and for inputs, numbers as text and sliders, modify processDwgCmds() as per the exampleCode.txt
Update the .ino file setup() method to initialize the interface, see exampleCode.txt

Add Task list and task results to the file tasklog.txt
 Task Completion Summary

  Wrapper Implementation (2 files)

  1. C4001_SafeString_Wrapper.h - Header file with class definition
  2. C4001_SafeString_Wrapper.cpp - Full implementation with:
    - Sensor initialization and SafeString support
    - Getters for status, motion detection, distances, delays, and sensitivities
    - Setters for all parameters with input validation
    - Unit conversions (seconds ↔ API units for delays)
    - Button handlers for sensor control

  Drawing Files Updated (13 files)

  All Dwg_*.cpp files now use the wrapper methods:
  - Input files: TrigDistInput, MaxDistInput, MinDistInput, KeepDelayInput, TrigDelayInput
  - Slider files: KeepSlider, TrigSlider
  - Button files: ButtonStart, ButtonStop, ButtonSave, ButtonReset, ButtonRestore

  Each file includes:
  - Add wrapper header include
  - Call wrapper setter in processDwgCmds()
  - Call wrapper getter in sendIndexedItems()

  Arduino Setup File Updated

  C4001controls_serial.ino now includes:
  - Sensor instance creation (I2C)
  - C4001.begin() with error handling
  - Wrapper initialization in setup()

  Features

  - ✅ String outputs for status and motion detection
  - ✅ Int outputs for distances and sensitivities
  - ✅ Unit conversion: seconds (UI) ↔ API units
  - ✅ Input validation with auto-correction
  - ✅ Range consistency checks (min ≤ trig ≤ max)
  - ✅ Error logging to Serial

  All code has been created and integrated into the C4001controls_serial subdirectory. The tasklog.txt file contains
   a detailed record of all completed work.
Here is the complete tasklog.txt Claude wrote and the resulting code is in claude_C4001controls_serial.zip, for a cost of US$0.45
Unzip
that to the Arduino sketch directory (overwrite the existing
C4001controls_serial directory) and compiling gave one error
#include
"../DFRobot_C4001.h"
No
such file or directory.
Claude was a bit too literal and referenced the DFRobot_C4001.h file supplied as reference. Correcting that include to #include "DFRobot_C4001.h" in both the .ino and the C4001_SafeString_Wrapper.cpp files fixed that problem.
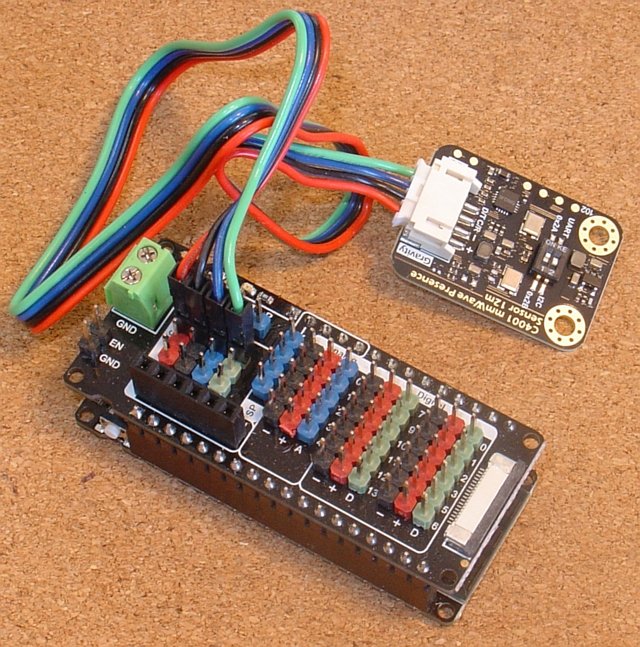
Using the Firebeetle and its IO shield, wiring up consists of plugging the shield in and plugging the C4001 into the shield.
Connect the board via Serial to your computer and display the GUI
via pfodWeb.html (from the pfodWeb directory in the pfodParser
library). See the pfodWeb
tutorial.
The C4001controls_serial.zip
contains the corrected files.
Use pfodWebDesigner to generate the BLE and HTTP versions. These
only differ in the ino file, so update the .ino files with the C4001
initialisation and copy over all the other files from the Serial
version.
The completed sketches are in C4001controls_ble.zip
and C4001controls_http.zip
The BLE version runs with pfodWeb.html on a Compatible Browser (Chrome or Edge). The BLE version also runs on Android using pfodApp.
The HTTP version can be displayed on any browser by first opening, pfodWeb.html. But the HTTP .ino sketch as has also been edited to enable
bool useLittleFSToServe_pfodWeb = true;
With this setting and with the data sub-directory (available
in the pfodWeb directory of the pfodParser library) loaded into the
microprocessor's file system. the microprocessor can server
pfodWeb.html itself.
See Installing
pfodWeb on your microprocessor for HTTP connections
This
allows an ESP32 or ESP8266 or Pi Pico W/2W to server pfodWeb directly
from the microprocessor, so you can display the GUI on any browser
(iPhone, Android, PC, Mac etc) by navigating to the microprocessor's
assigned IP.
This project used pfodWebDesigner to design a GUI for the C4001 mmWave Human Detection Sensor control. The C4001 has 9 controls and 5 buttons. The pfodWebDesigner generated a complete Arduino Sketch to display the GUI on pfodWeb via a Serial connection. Claude AI was then used to code the interface between the C4001 API and the GUI controls. The result was an almost perfect set of sketch files which allows the GUI to configure the C4001 settings. The AI usage charge was less than 50 cents.
pfodWebDesigner was also used to generate BLE and HTTP versions of the GUI. Only the .ino files needed to be changed to connect via BLE or HTTP to pfodWeb.html. Finally the data directory containing the pfodWeb files was uploaded to the microprocessor running the HTTP sketch which allowed the GUI to be displayed on any browser by navigating to the IP assigned to the microprocessor.
AndroidTM is a trademark of Google Inc. For use of the Arduino name see http://arduino.cc/en/Main/FAQ
The General Purpose Android/Arduino Control App.
pfodDevice™ and pfodApp™ are trade marks of Forward Computing and Control Pty. Ltd.

Contact Forward Computing and Control by
©Copyright 1996-2024 Forward Computing and Control Pty. Ltd.
ACN 003 669 994