|
Home
| pfodApps/pfodDevices
| WebStringTemplates
| Java/J2EE
| Unix
| Torches
| Superannuation
|
| About
Us
|
|
|
Europa Ice Sampling
|
by Matthew Ford 29th March 2022 (originally posted 29th March
2022)
© Forward Computing and Control Pty. Ltd. NSW
Australia
All rights reserved.
This page covers the circuits and sketches currently used in the
Europa Ice Sampling prototype.
The results are described in
“Recovery
of microbes from sub-surface Europa analog environments: An improved
thermal probe for collecting biological samples from the surface of
icy moons.” [1]
“The ultra-low temperatures (100K) and ultra-low pressures (<10-6 atm) that exist on the surface of icy moons present a formidable challenge in collecting biological samples. Standard drilling technology is not efficient in these conditions, where conduction of thermal energy leads to freezing in place, and shear forces impart a strenuous test on microbial viability. If microbes exist within the first few meters of the surface, an extraction process must be gentle enough to recover them intact. This report describes a substantial improvement from Davis (2017), which presented a concave conical thermal probe capable of penetrating -65°C ice in 0.01 atm pressure. The current report describes a device for penetrating -160°C ice in 0.0001 atm pressure, which is analogous to the physical conditions on the surface of icy moons. In addition, the probe can harvest a sensitive bacteria (E.coli) from under a layer of acidified peroxide ice (pH 1.1), which is analogous to the expected surface chemical composition of the icy moon Europa. In field tests, multiple organisms were extracted in a viable state and chemical analysis indicated fine delineation of stratified layers. Finally, attaching the thermal tip to a telescopic mechanism allowed the probe to penetrate through 1.0 meters of ice, which is well below the depth of harmful radiation expected at the sub-surface of Europa. The current work opens the door for a lander vehicle to penetrate the sub-surface of Europa and analyze biologically active samples.” [1]
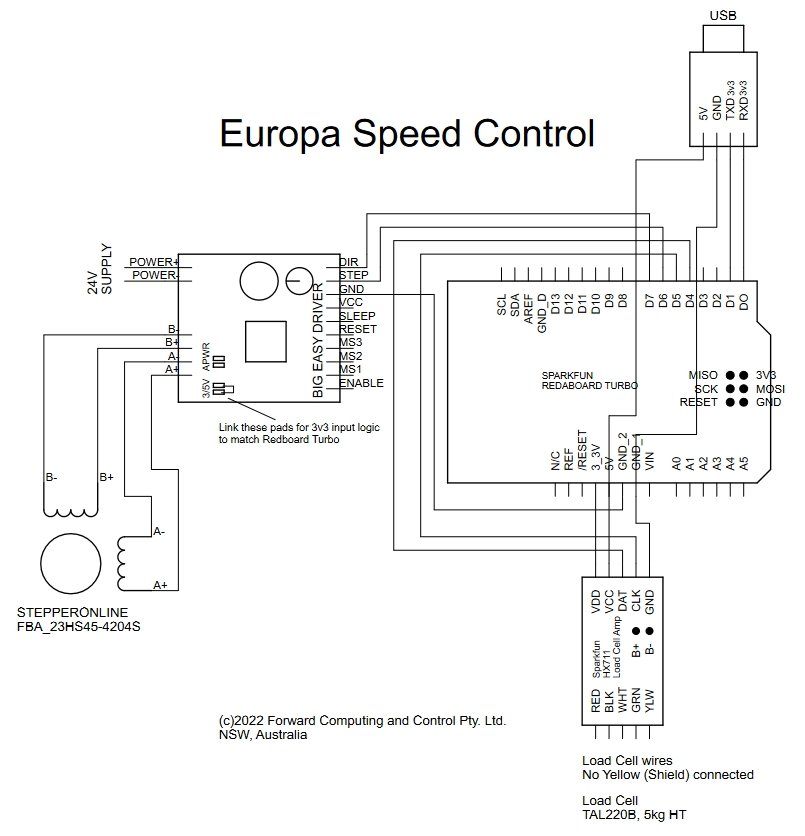
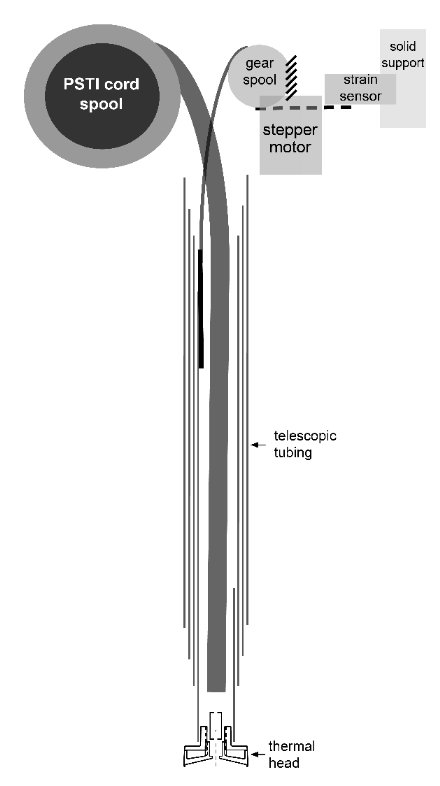
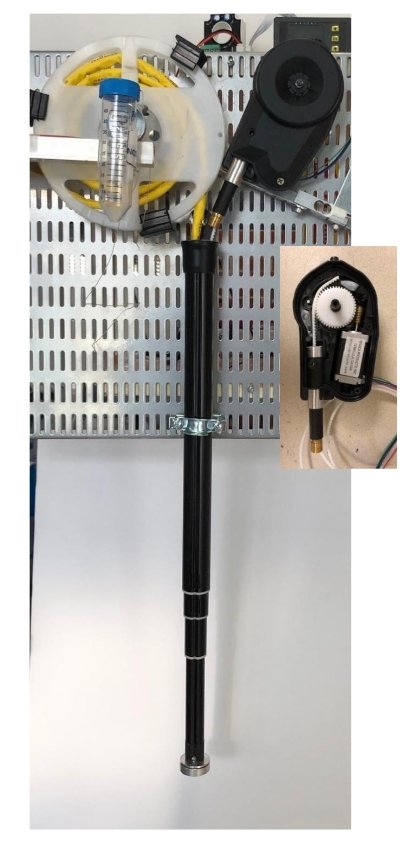
The control consists of two parts, the speed control of the probe as it melts through the ice and the temperature control of the sample temperature.
The speed of the probe is controlled to exert a given pressure on the ice melt in order to force the melt up the sampling tube.
The Europa Ice Sampling probe prototype uses a Sparkfun Redboard Turbo programmed via Arduino IDE reading a TAL220B 5kg load cell via a Sparkfun HX711 Load Cell Amplifier and driving a SM-42BYG011-25 stepper motor via an Easy Driver
Monitoring and control is via a USB to TTL 3V3 converter because the on board Redboard USB connection is very slow and interferes with the stepper motor control. (See Stepper Speed Control Library for Arduino)
The controlling Arduino sketch is EuropaSpeedControl_Rev7_Lg_motor.ino (EuropaSpeedControl_Rev7_Lg_motor.zip) and the supporting Arduino libraries are contained in libraries.zip. The board support for Sparkfun Redboard Turbo needs to installed for the Arduino IDE V1.9.18
Programming the Redboard Turbo is problematic. If it fails to program, first press the reset pushbutton once and reselect the COM port in Arduino Tools menu and retry. If that does not work, double press the reset push button and try again.
Two coil stepper motors have 4 wires. Use a multimeter to find the pairs that connect to each coil and then wire one coil to the Easy Driver A terminals and the other coil to B terminal. It does not matter which way round you wire them because you can use the s cmd in the setup menu to swap the direction of movement.
The motor power supply is wired to the M+ and GND
Set the logic
level of the board with the 3/5V link. Short the link together for
3.3V microprocessor outputs, like the SparkFun Redboard Turbo (if you
leave it open it is suitable for 5V digital signals, e.g. UNO,
Mega)
Connect the GND, STEP, DIR pins to the microprocessor GND
and the step and dir output pins.
No other connections are necessary to drive the motor.
When moving the SpeedStepperSetup sketch from the Uno/Mega to the
Redboard Turbo you might naively just replace #define SERIAL Serial
with #define SERIAL SerialUSB to suit the Redboard Turbo usb serial
connection, however you would find that the resulting stepper latency
is about 10ms. That is 10x slower then for the UNO. This due to how
the Redboard cpu handles the USB connection. To over come this,
connect a USB to TTL Serial Cable to D0/D1 and set
#define
SERIAL Serial1
to use the hardware serial connection to
control the stepper motor. Using Serial1 gives LATENCY:
stepper:345us loop:2016us which is 3 time faster then the UNO for
the stepper and loop latency
The Arduino Serial Monitor is a little harder to use to control the stepper motor as you have to enter the char in the cmd line and then press Enter to send it. A quicker more responsive means is to open a terminal window, TeraTerm for PC (or CoolTerm Mac), connected to the USB to TTL cable COM port. Then in that window pressing a cmd key sends it immediately. Pressing Enter just send a empty line.
As wired up above, the Easy Drive is configured for 1/8th steps, so 1000 step/sec will turn the motor at 1000 / 8 / 200 step/revolution = 0.625 revs per sec or 37.5 rpm maximum. By changing the inputs to MS1/MS2 you can switch between 1/8, ¼, ½ and full steps. For full steps connect both MS1 and MS2 to GND. This will allow speeds of up to 300 rpm. Choosing the appropriate MS1/MS2 settings allows you to adjust for installed gear ratio between the motor and the driven part.
While the SpeedStepper library allows you to set position limits on the motor movement, the tacking of the position is done by counting the steps output by the software. If the motor stalls, i.e. the torque is insufficient to drive the motor the next step then the software position will be out of sync with the motor position. Then when you use the 'goHome' command the motor will overshoot the home position. To prevent damage to the hardware you should fit limit switches at the hard limits to disconnect the motor power supply.
First, set it to the lowest setting of the potentiometer. i.e. voltage at TP1 is minimum. The potentiometer is delicate, so don't force the potentiometer past the mechanical stops. Set the motor driving at a slow steady speed a slow, then slowly turn the potentiometer until the motor doesn’t skip or jerk between steps.
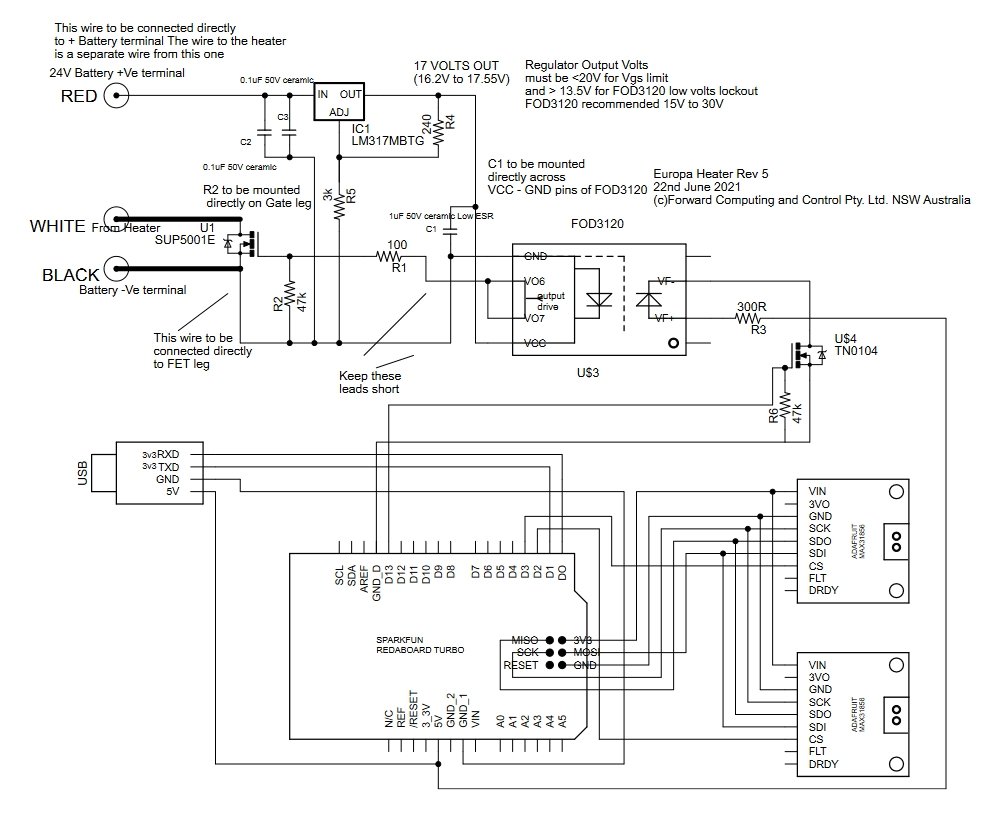
The temperature control of the Europa Ice Sampling probe prototype uses a Sparkfun Redboard Turbo programmed via Arduino IDE reading two Type T thermocouples via Adafruit MAX31856 thermocouple amplifiers. These then control the PWM signal powering the heating coil at the head of the probe via an opto-isolator driving a power N-FET.
Monitoring and control is via a USB to TTL 3V3 converter because the on board Redboard USB connection is very slow and interferes with the stepper motor control. (See Stepper Speed Control Library for Arduino)
The controlling Arduino sketch is Europa_heater_2.ino (Europa_heater_2.zip) and the supporting Arduino libraries are contained in libraries.zip. The board support for Sparkfun Redboard Turbo needs to installed for the Arduino IDE V1.9.18
Control of the heating wire in the probe tip is via a cascade (floating setpoint) temperature control. The sample processing requires a nominal 25degC. The temperature at the sample processing is measured by the primary thermocouple. The error between the sample temperature and the desired setpoint is used to drive a floating set point for the probe head heater. The second thermocouple embedded in the probe head then controls the probe head temperature to this floating setpoint.
This process needs more work as the sample has been seen to freeze in the sample tube. One possible change would be to initially make the sample setpoint high, say 70degC and run the probe head heater at maximum before it contacts the ice. Then switch to the desired 25decC sample setpoint once the 70degC setpoint is reached indicating the sample is flowing freely from the probe tip. Alternatively, or in addition, additional insulation / header could be added around the sample tube from the probe tip to prevent freezing.
[1] – Davis and Ford, 2022, pre-review Astrobiology journal submission.
For use of the Arduino name see http://arduino.cc/en/Main/FAQ

Contact Forward Computing and Control by
©Copyright 1996-2020 Forward Computing and Control Pty. Ltd.
ACN 003 669 994