
|
Home
| pfodApps/pfodDevices
| WebStringTemplates
| Java/J2EE
| Unix
| Torches
| Superannuation
|
| About
Us
|
|
|
How to code Timers and Delays
|
by Matthew Ford 20th Dec 2021 (original - 21st
March 2013)
© Forward Computing and Control Pty. Ltd. NSW
Australia
All rights reserved.
How
not to
code a delay in Arduino
How
to write a non-blocking delay in Arduino
Unsigned
Long, Overflow and Unsigned Subtraction
Using
the millisDelay library
Delay and Timer
Examples – Single-Shot Delays and Repeating Timers
Delay
execution until condition has been true for X secs
Led/Buzzer/Valve
Sequencing
A PinFlasher class and
example
Other
millisDelay Library Functions
Word
of Warning – Add a loop monitor
20th
Dec 2021 update: added
PinFlasher class and example (included in
SafeString library
V4.1.13+)
29th
May 2021 update: re-wrote examples as 'tasks' from
Simple
Multi-tasking in Arduino
2nd
Feb 2021 update: added Blocking
and Sequencing examples and Delayed execution
6th Jan 2021 update:
The millisDelay class is now part of the SafeString library V3+.
Download SafeString from the Arduino Library manager or from its zip
file
5th Sept 2019 update: Removing delay() calls is the first
step to achieving simple multi-tasking on any Arduino board. Simple
Multi-tasking in Arduino covers all the other necessary
steps.
5th
May 2019 update: Renamed
isFinished() to justFinished(), as it only returns TRUE once just
after the delay finishes
18th October 2018 update: Rewritten to
use millisDelay library
Also see Arduino For
Beginners – Next Steps
Taming
Arduino Strings
How
to write Timers and Delays in Arduino (this one)
SafeString
Processing for Beginners
Simple
Arduino Libraries for Beginners
Simple
Multi-tasking in Arduino
Arduino
Serial I/O for the Real World
If you are just looking for info on how to
use the millisDelay library, install the SafeString library and jump
to Using the millisDelay library
If
you just want to flash an output pin On and Off at a given rate,
install the SafeString library and jump to PinFlasher
Don't use delay( )
Using delay() causes your system to be stuck while waiting for the delay to expire. However replacing delays requires some care. This page explains in a step by step way how to replace Arduino delay() with a non-blocking version that allows you code to continue to run while waiting for the delay to time out. This is the first step to achieving simple multi-tasking on any Arduino board. The companion tutorial Simple Multi-tasking in Arduino covers all the other necessary steps.
Here are a number of simple sketches each of which turn a Led on when the Arduino board is powered up (or reset) and then 10sec later turns it off. The first one is an example of how you should NOT write the code. The second is an example of code the works and the third is an example of using the millisDelay library to simplify the code. There are also examples of single-shot and repeating timers.
If you already understand why you should not use delay() and are familiar with Arduino, the importance of using unsigned longs, overflow and unsigned subtraction, then you can just skip to Using the millisDelay library
The
tutorial has been revised to replace elapsedMillis
library with the millisDelay
library The millisDelay library provides more functionality, is
simpler to use and easier to understand for those new to Arduino.
(The pfodParser
library V3.30+ also includes a duplicate class called
pfodDelay)
The millisDelay class is now part of the SafeString
library V3+. Download SafeString from the Arduino Library manager or
from its zip file
SafeString is now available via the Arduino
Library Manager, thanks to Va_Tech_EE
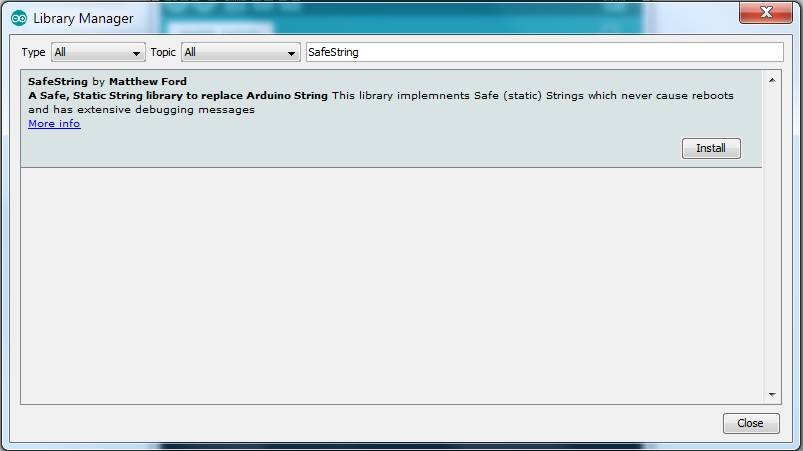
Start
the Arduino IDE, open the library manager via the menu Tools->Manage
Libraries..
Type SafeString
into the Filter your
search search bar and mouse over the
SafeString entry and click on Install.
Here is how NOT to code a delay in a sketch.
int led = 13;
bool ledOn;

void setup() {
  Serial.begin(9600);
  pinMode(led, OUTPUT);   // initialize the digital pin as an output.
  digitalWrite(led, HIGH); // turn led on
  ledOn = true; // led is on
}

void loop() {
  if (ledOn) {
    delay(10000);
    digitalWrite(led, LOW); // turn led off
    ledOn = false;  // prevent this code being run more then once
    Serial.println("Turned LED Off");
  }
//  Other loop code here . . .
  Serial.println("Run Other Code");
}
In the setup() method, which Arduino calls once on starting up, the led is turned on. Once setup() is finished, Arduino calls the loop() method over and over again. This is where most of you code goes, reading sensors sending output etc. In the sketch above, the first time loop() is called, the delay(10000) stops everything for 10secs before turning the led off and continuing. If you run this code you will see that the Run Other Code is not printed out for 10sec after the startup, but after the led is turned off (ledOn equals false) then is printed out very fast as loop() is called over and over again.
The point to note here is that you really should not the delay() function at all in the loop() code. It is sometimes convenient to use delay() in the setup() code and you can often get away with very small using very small delays of a few milliseconds in the loop() code, but you really should avoid using the at all in the loop() method
The previous sketch used a blocking delay, i.e. one that completely stopped the code from doing any thing else while the delay was waiting to expire. This next sketch shows you how to write a non-blocking delay that allows the code to continue to run while waiting for the delay to expire.
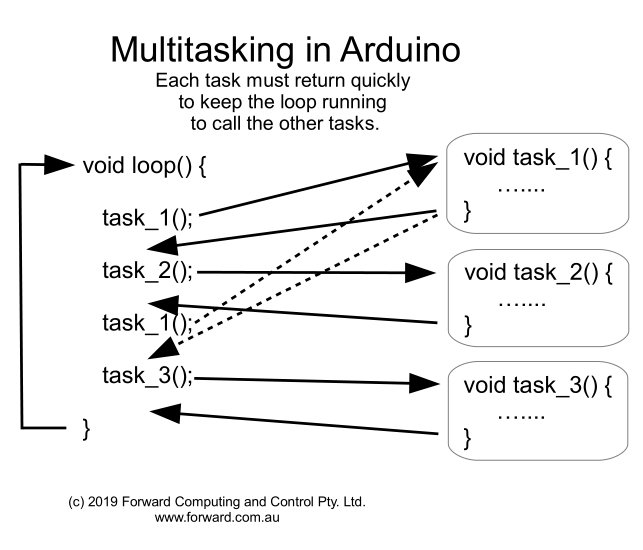
It follows the 'task based' approach to coding where the loop call multiple tasks that return quickly. See Simple Multi-tasking in Arduino for more details
See below for how the millisDelay library simplifies this code
int led = 13;
unsigned long delayStart = 0; // the time the delay started
bool delayRunning = false; // true if still waiting for delay to finish

void setup() {
  pinMode(led, OUTPUT);   // initialize the digital pin as an output.
  digitalWrite(led, HIGH); // turn led on

  delayStart = millis();   // start delay
  delayRunning = true; // not finished yet
}

void checkLed() { // the led task
  // check if delay has timed out after 10sec == 10000mS
  if (delayRunning && ((millis() - delayStart) >= 10000)) {
    delayRunning = false; // // prevent this code being run more then once
    digitalWrite(led, LOW); // turn led off
    Serial.println("Turned LED Off");
  }
}

void loop() {
  checkLed();
//  Other loop code here . . .
  Serial.println("Run Other Code");
}
In the sketch above, in the setup() method, the delayStart variable is set to the current value of millis(). millis() is a built-in method that returns the number of milliseconds since the board was powered up. It starts as 0 each time the board is reset and is incremented each millisecond by a CPU hardware counter. More about millis() later. Once setup() is finished, Arduino calls the loop() method over and over again.
Each time loop() is called the code calls checkLed() to check a) that the delay is still running, and b) if the millis() has move on 10000 mS (10sec) from the value stored in delayStart. When the time has move on by 10000mS or more, then delayRunning is set to false to prevent the code in the if statement being executed again and the led turned off.
If you run this sketch, you will see Run Other Code printed out very quickly and after 10sec the Led will be turned off and if you are quick you might just see the Turned LED Off message before it scrolls off the screen.
If you are familiar with unsigned longs, overflow, unsigned arithmetic and the importance of using an unsigned long variable, then you can just skip to Using the millisDelay library below.
The
important part of this sketch is the test
(millis() - delayStart)
>= 10000
This test has to be coded in this very specific way for it to work.
The delayStart variable and number returned from the millis() built-in function is an unsigned long. That is a number from 0 upto a large positive integer. The maximum value an unsigned long can have depends on the number of binary bits set aside to hold the value. For Arduino Uno, Mega etc, an unsigned long has 32bit and can range from 0 to 4,294,967,295.
If you add 1 to an unsigned long holding the maximum value of 4,294,967,295 the answer will be 0 (zero). That is the number overflowed and wrapped around back to 0. You can imagine the overflow bit just gets dropped. e.g. in a 3 bit unsigned 111 is the maximum value (7) adding 1 gives 1000 (8) but the leading 1 overflows the 3 bit storage and is dropped so wrapping back to 000.
This means, eventually, when the cpu adds one more it variable holding the millis() result it will wrap around to 0. That is millis() will start counting from 0 again. This will happen if you leave your Arduino board running for 4,294,967,295mS i.e. about 49day 17hrs, say 50days.
Now let's
consider another way of coding the test (millis() - delayStart) >=
10000
Arithmetically this test is equal to millis() >=
(delayStart + 10000)
However if you start the delay after almost 50 days, for example when millis() returns 4,294,966,300 mS, then delayStart + 10000 will overflow to 995 and the test, millis() >= (delayStart + 10000), will immediately be true and there will be no delay at all. So this form of the test does not always work. Unfortunately you are unlikely to come across this during your testing, but for it may crop up un-expectedly in a long running device, like a garage door control the runs continually for months.
You will get
a similar problem if you try and use delayEnd = millis() + 10000
and then the test
(millis() >= delayEnd)
Finally the delayStart variable must be an unsigned long . If you instead use a long (i.e. long int) or int or unsigned int , the maximum value they can hold is smaller than the unsigned long returned from millis(). Eventually the value retuned from millis() will overflow the smaller variable it is being stored in and you will find time has suddenly gone backwards. For example, if you use an unsigned int for startDelay, this will happen after 65sec on an Uno board.
One other point of interest is what happens to result of millis() - delayStart when delayStart is say 4,294,966,300 and we want a 10000mS delay. millis() will wrap around to 0 before that happens. Remember that adding 1 to the maximum value an unsigned long can store wraps around back to 0. So one way of looking at calculating millis() - delayStart, where millis() has wrapped around and is smaller then delayStart, is to say “What number do I have to add to delayStart to equal millis() (after overflow)?” i.e. what is X in the equation delayStart + X == millis()
For example using a 3 bit unsigned variable again, to calculate 2 – 4 (unsigned), think of a clock face starting at 0 and adding 1 all the way round to 111 (7) and then back to 0. Now to get from 4 to 2 you need to add 6 (5,6,7,0,1,2) so 2-4 = 6 and this is in effect how the calculation works, although the CPU will perform the calculation differently.
So the difference of two unsigned longs will always be a positive number in the range 0 to 4,294,967,295. For example if startDelay is 1 and millis() has wrapped around to 0 (after 50days) then millis() - startDelay will equal 4,294,967,295. This means that you can specify a DELAY_TIME anywhere in the range 0 to 4,294,967,295mS and (millis() - delayStart) >= DELAY_TIME will always work as expected, regardless on when the delay is started.
The
millisDelay library is part of the SafeString library V3+. Download
SafeString from the Arduino Library manager or from its zip
file
Once you install the SafeString library there will be
millisDelay examples available, under File->Examples->SafeString
that
you can load on your Arduino board and then open the Serial Monitor
(within 5sec) at 9600baud to use them.
The justFinished() method MUST be called every loop() in order for the millisDelay to timeout. So in your loop code have either
if (ledDelay.justFinished()) {
  // do something when the delay finishes
}
OR
pumpStartDelay.justFinished(); // check timeout and set isRunning() false when timed outDo not combine the call to justFinished() with any other condition or inside any if( ) or while( ) statements.
millisDelay ledDelay; // create a delaythen somewhere in the code based on some condition start the delay
ledDelay.start(10000); // start a 1000mS delayBefore start( ) is called isRunning() will return false and justFinished() will never return true.
Then every time loop() is executed call
 if(ledDelay.justFinished()) {
   // only returns true just once after start called
   // updates isRunning to false when justFinished() returns true
 }
Elsewhere in your code you can check ledDelay.isRunning() to see if the delay is still timing out. You can combine isRunning() with other conditions like
  if (pushButtonPressed && (!ledDelay.isRunning())) {
    // pushButton pressed AFTER delay timed out
    // see Blocking Delay example below
  }
Here is the previous non-blocking delay sketch re-written using the millisDelay library
#include <millisDelay.h>
int led = 13;
millisDelay ledDelay;

void setup() {
  pinMode(led, OUTPUT);   // initialize the digital pin as an output.
  digitalWrite(led, HIGH); // turn led on

  ledDelay.start(10000);  // start a 10sec delay
}

void checkTurnOffLed() { // the led task
  // check if delay has timed out
  if (ledDelay.justFinished()) { // only returns TRUE once.
    digitalWrite(led, LOW); // turn led off
    Serial.println("Turned LED Off");
  }
}

void loop() {
  checkTurnOffLed();
//  Other loop code here . . .
  Serial.println("Run Other Code");
}
If you look at the millisDelay library code you will see that the previous sketch's code has just been moved to the start() and justFinished() methods in the library.
Is this a ledDelay or a ledTimer? You can use which ever term you like. I tend to use ...delay for single-shot delays that execute once and use …timer for repeating ones.
Here are two basic delay and timer sketches and their millisDelay library equivalents. These examples are for a once off (single-shot) delay and a repeating delay/timer.
A single shot delay is one that only runs once and then stops. It is the most direct replacement for the Arduino delay() method. You start the delay and then when it is finished you do something. BasicSingleShotDelay is the plain code and SingleShotMillisDelay uses the millisDelay library.
This sketch is available in BasicSingleShotDelay.ino
int led = 13; // Pin 13 has an LED connected on most Arduino boards.

unsigned long DELAY_TIME = 10000; // 10 sec
unsigned long delayStart = 0; // the time the delay started
bool delayRunning = false; // true if still waiting for delay to finish

void setup() {
  pinMode(led, OUTPUT);   // initialize the digital pin as an output.
  digitalWrite(led, HIGH); // turn led on

  // start delay
  delayStart = millis();
  delayRunning = true;
}

void checkTurnOffLed() {
  // check if delay has timed out
  if (delayRunning && ((millis() - delayStart) >= DELAY_TIME)) {
    delayRunning = false; // finished delay -- single shot, once only
    digitalWrite(led, LOW); // turn led off
  }
}
void loop() {
  checkTurnOffLed(); // call the led task may just return
}
In
the code above the loop()
continues
to run without being stuck waiting for the delay to expire.
During
each pass of the loop(),
the difference between the current millis()
and
the delayStart
time
is compared to the DELAY_TIME.
When the timer exceeds the value of the interval the desired action
is taken. In this example the delay timer is stopped and the LED
turned off.
Here is the BasicSingleShotDelay sketch re-written using the millisDelay library. This sketch is available in SingleShotMillisDelay.ino
Here is the millisDelay version where the code above has be wrapped in class methods of the millisDelay class.
#include <millisDelay.h>

int led = 13;
// Pin 13 has an LED connected on most Arduino boards.

millisDelay ledDelay;

void setup() {
  // initialize the digital pin as an output.
  pinMode(led, OUTPUT);
  digitalWrite(led, HIGH); // turn led on

  // start delay
  ledDelay.start(10000);
}

void checkTurnOffLed() { // the led task
  // check if delay has timed out
  if (ledDelay.justFinished()) {
    digitalWrite(led, LOW); // turn led off
  }
}
void loop() {
  checkTurnOffLed(); // call the led task, may just return
}These are simple examples of a repeating delay/timer. BasicRepeatingDelay is the plain code and RepeatingMillisDelay uses the millisDelay library.
This sketch is available in BasicRepeatingDelay.ino
int led = 13; // Pin 13 has an LED connected on most Arduino boards.

unsigned long DELAY_TIME = 1500; // 1.5 sec
unsigned long delayStart = 0; // the time the delay started
bool delayRunning = false; // true if still waiting for delay to finish

bool ledOn = false; // keep track of the led state

void setup() {
  pinMode(led, OUTPUT);   // initialize the digital pin as an output.
  digitalWrite(led, LOW); // turn led off
  ledOn = false;

  // start delay
  delayStart = millis();
  delayRunning = true;
}

void checkToggleLed() { // led task
  // check if delay has timed out
  if (delayRunning && ((millis() - delayStart) >= DELAY_TIME)) {
    delayStart += DELAY_TIME; // this prevents drift in the delays
    // toggle the led
    ledOn = !ledOn;
    if (ledOn) {
      digitalWrite(led, HIGH); // turn led on
    } else {
      digitalWrite(led, LOW); // turn led off
    }
  }
}
void loop() {
  checkToggleLed(); // call to toggle led based on timer
}
The
reason for using
delayStart
+= DELAY_TIME;
to reset the delay
to run again, is it allows for the possibility that the
millis()-delayStart may
be > DELAY_TIME because
the millis() has just incremented or due to some other code in the
loop() that slows it down. For example a long print statement.
(See
the Adding a Loop Montor below)
Another point is to start the delay at the end of startup(). This ensures the timer is accurate at the start of the loop(), even if startup() takes some time to execute.
Here is the BasicRepeatingDelay sketch re-written using the millisDelay library. This sketch is available in RepeatingMillisDelay.ino
#include <millisDelay.h>

int led = 13;
// Pin 13 has an LED connected on most Arduino boards.
bool ledOn = false; // keep track of the led state

millisDelay ledDelay;

void setup() {
  // initialize the digital pin as an output.
  pinMode(led, OUTPUT);   // initialize the digital pin as an output.
  digitalWrite(led, LOW); // turn led off
  ledOn = false;

  // start delay
  ledDelay.start(1500);
}

void checkToggleLed() { // led task
  // check if delay has timed out
  if (ledDelay.justFinished()) {
    ledDelay.repeat(); // start delay again without drift
    // toggle the led
    ledOn = !ledOn;
    if (ledOn) {
      digitalWrite(led, HIGH); // turn led on
    } else {
      digitalWrite(led, LOW); // turn led off
    }
  }
}
void loop() {
  checkToggleLed(); // check if should toggle led based on timer
}A common use for timers is to delay turn on/off to prevent motors, pumps, etc from quickly switching on and off repeatedly. The sketch BlockingMillisDelay.ino illustrates this. After the Led turns off it is blocked from turning on again for 10sec. The ledBlockOnDelay.justFinished() is called very loop() to check when the delay has timed out. It sets the ledBlockOnDelay.isRunning() to false when it times out.
// BlockingMillisDelay
#include <millisDelay.h>
int led = 13;

// have const here so it is easy to find and change
const unsigned long DELAY_TIME = 2000; // in mS (2sec)
millisDelay ledOnDelay; // the delay object to keep led on for 2sec

const unsigned long BLOCKING_DELAY_TIME = 10000; // in mS (10sec)
millisDelay ledBlockOnDelay; // the delay object to prevent turning led on again for 10sec after it goes off

// the setup routine runs once when you press reset:
void setup() {
  // initialize the digital pin as an output.
  Serial.begin(9600);
  // wait a few sec to let user open the monitor
  for (int i = 5; i > 0; i--) {
    delay(1000);
    Serial.print(i); Serial.print(' ');
  }
  Serial.println();

  Serial.println("Enter R to turn LED on for 1sec");
  Serial.println(" After LED goes off it is blocked from turning on again for 10sec");

  pinMode(led, OUTPUT);
  digitalWrite(led, LOW);
}

void checkTurnOffLedStartBlocking() {
  if (ledOnDelay.justFinished()) { // don't combine this test with any other condition
    // on delay timed out
    digitalWrite(led, LOW); // turn led off
    Serial.println("ledOnDelay finished, LED turned off.");
    ledBlockOnDelay.start(BLOCKING_DELAY_TIME);
  }
}

// returns 0 if nothing read
char readChar() {
  char c = 0;
  if (Serial.available()) {
    c = Serial.read();
    while (Serial.available()) {
      Serial.read(); // clear rest on input
    }
  }
  return c;
}

void processChar(char c) {
  if (c == 0) { // usual
     return;
  }
  if ((c == 'R') || (c == 'r')) {
    if (ledBlockOnDelay.isRunning()) {
      Serial.print("LED blocked from turning on for next "); Serial.print(ledBlockOnDelay.remaining()); Serial.println("mS");
    } else {
      // can turn led on again
      ledOnDelay.start(DELAY_TIME);
      digitalWrite(led, HIGH); // turn let on
      Serial.println("ledDelay.start(...) called and Led turned ON");
    }
  } else if ((c == '\n') || (c == '\r')) {
    // skip end of line chars
  } else if (c != 0) {
    Serial.print("Invalid cmd:"); Serial.println(c);
  }
}
void loop() {
  ledBlockOnDelay.justFinished(); // check for timeout and set isRunning() false when timed out
  checkTurnOffLedStartBlocking();
  char c = readChar(); // read char task just returns 0 if nothing to read
  processChar(c);  // process char read, ignores 0
}Another common task is to wait for a time after a condition
becomes true before executing some statement (usually a method call).
In the example below, DelayExecution.ino,
we delay printing a “Finished” message until there has
been no input from the Serial Monitor for 5secs.
The bool
executedMethod is set true when the execution occurs and prevents
more then one execution if the condition remains true for a long
time. Each time the condition is false the executedMethod is
set to false again to enable another execution once the condition is
true again for X sec.
#include <millisDelay.h>
millisDelay executionDelay; // the delay object
unsigned long executionDelay_mS = 5000;

bool executedMethod = false;

bool condition() {  // returns when the condition is true
  return (Serial.read() == -1);  // Serial.read() returns -1 when there is nothing to read
  // other types of conditions could be  Range < 5cm etc
}

void setup() {
  Serial.begin(115200);
  // wait a few sec to let user open the monitor
  for (int i = 5; i > 0; i--) {
    delay(1000);
    Serial.print(i); Serial.print(' ');
  }
  Serial.println("Enter input at least every 5 secs");
}

void loop() {
  if (executionDelay.justFinished()) { // nothing read for 10 sec
    //executionDelay only returns true once after start()
    // do something here
    executedMethod = true;  // only do this once even if condition remains true for a long time
    Serial.println(" No input for 5 sec.");
  }

  if (condition()) {
    if (!executionDelay.isRunning() && (!executedMethod)) {
      // start it now
      executionDelay.start(executionDelay_mS);
    } // else already timing out don't disturb it OR has already timed out and executed

  } else { // condtion() is false  out side range etc
    // stop timer
    executionDelay.stop();
    // clear executedMethod so will execute again one condition is true for 5sec
    executedMethod = false;
  }
}Another common task is sequencing a pattern on a flashing led OR sequencing the delays between opening of valves OR turning on a buzzer. The LedSequencingMillisDelay.ino sketch shows how to use an array of delays times to create a led flashing pattern.
#include <millisDelay.h>
int led = 13;
unsigned long onOffDelays[] = {2000, 1000, 500, 100, 500, 200};
//                             off,  on,  off,  on, off,  on
//                           the off/on sequence depends of the led (on or off) setting in startSequence for the first delay

const size_t NUMBER_OF_STEPS = 6; // can be smaller the number of elements in onOffDelays but not larger
size_t stepIdx = 0;

millisDelay ledOnOffDelay; // the delay object
bool ledOn = false;

void setup() {
  Serial.begin(9600);
  for (int i = 5; i > 0; i--) {
    delay(1000);
    Serial.print(i); Serial.print(' ');
  }
  Serial.println();
  //check the size of the onOffDelay versus NUMBER_OF_STEPS
  if ( (sizeof(onOffDelays) / sizeof(unsigned long)) < NUMBER_OF_STEPS) {
    while (1) {
      Serial.print(" !! Error NUMBER_OF_STEPS:"); Serial.print(NUMBER_OF_STEPS); Serial.println(" exceeds number of values in onOffDelays[]");
      delay(5000); // print every 5 secs for ever
    }
  }

  pinMode(led, OUTPUT);
  digitalWrite(led, LOW); // led off
  startSequence(); // start the sequence
}

void startSequence() {
  stepIdx = 0;
  ledOnOffDelay.start(onOffDelays[stepIdx]);
  digitalWrite(led, LOW); // TURN led off for first step
  ledOn = false;
}

void toggleLedSequence() {
  if (ledOnOffDelay.justFinished()) { // don't combine this test with any other condition
    // on delay timed out
    // toggle led
    ledOn = !ledOn;
    if (ledOn) {
      digitalWrite(led, HIGH); // turn led on
    } else {
      digitalWrite(led, LOW); // turn led off
    }
    stepIdx++;
    if (stepIdx >= NUMBER_OF_STEPS) {
      stepIdx = 0; // repeat sequence
    }
    ledOnOffDelay.start(onOffDelays[stepIdx]);
  }
}

void loop() {
  toggleLedSequence();
}
If you were sequencing delays between valve opening then add a second array which contains the pin number to be switched on at that point e.g.
//     delay to next pin switch
unsigned long delays[] = {2000, 1000, 500, 100, 500, 0};
int pinNo[] =            {5,    6,   7,    8,   9,   10};
// i.e. switch pin 5 and start delay 2000 to switch pin 6 and start delay 1000, etc
// stop when pin 10 switchedThe PinFlasher class is included in the SafeString library V4.1.13+ and extends millisDelay to provide a simple means of turning an output pin On and Off at a given rate. To use PinFlasher, create a PinFlasher instance that specifies the output pin to flash and the whether on is HIGH (default) or on is LOW e.g.
#include <PinFlasher.h>
PinFlasher flasher(13);   // set led on pin 13 as the output and turns it off, i.e. set the output LOW
PinFlasher f(4,true);       // set pin 4 as the output. This drives an active LOW relay so inverts the logic so that setting it initially off, sets the output HIGH
Then the loop() code call update() at least once a loop() (or more often) to toggle the outputs on/off e.g.
void loop() {
  flasher.update();   // check if output 13 should be toggled, calls the underlying millisDelay.justFinished() method and toggles the output and restarts the delay timer if necessary
  f.update();  // check if output 4 should be toggled
Finally to start the output flashing call
flasher.setOnOff(100);  // led goes on (i.e. HIGH) for 100ms and then off (i.e. LOW) for 100ms and then repeats.
f.setOnOff(1000);  // output 4 goes on (i.e. LOW since the logic is inverted for this pin) for 1sec and then off (i.e. HIGH) for 1s and then repeats.
To stop the flashing call setOnOff( ) with the 'magic' values
PIN_ON or PIN_OFF, e.g.
flasher.setOnOff(PIN_OFF);  // set led off i.e. set output LOW
f.setOnOff(PIN_ON);  // set output 4 hard on i.e. set the output LOW since PinFlasher f(4,true) has the output logic inverted, i.e. active LOW
That's about it. See the SafeString
library docs for the other two methods setPin() and
invertOutput(). The SafeString library contains FlasherExample.ino
file (under millisDelay examples).
One other point to note is that repeated calls to say
flasher.setOnOff(100); will be ignored (will not interfere
with the flashing) if the on/off time argument has not changed. This
simplifies the loop() logic.
Often you want to flash a led to
indicate a particular program state, for example, door open / door
closed / lost WiFi connection your loop() can be simply
#include <PinFlasher.h>
// other includes here

PinFlasher ledFlasher(13);   // set led on pin 13 as the output and turns it off, i.e. set the output LOW

void setup() { … }
void loop() {
  ledFlasher.update();  // always call this each loop()
  // . . other code

  if (WiFi.status() != WL_CONNECTED) {
    ledFlasher.setOnOff(100); // fast flash if wifi connection lost
  } else if (door.isOpen()) {
    ledFlasher.setOnOff(1000); // slow flash if the door is open
  } else {
    ledFlasher.setOnOff(PIN_OFF); // turn off led if all OK, whether to output goes LOW or HIGH when off is set by the constructor.
  }

  // .. other code
}
Because extra calls to setOnOff( ) do nothing if the argument has not changed you don't have to keep track of what the previous state of the door/wifi was, just call the flash interval you want for each state, if the led is already flashing at that rate then if just continues to flash until the state changes and your code calls setOnOff( ) with a different argument. Finally because the mapping of on/off to HIGH/LOW is set by the constructor, your code can use the more readable PIN_ON, PIN_OFF arguments rather then pin output level settings, HIGH/LOW
In addition to the start(delay), justFinished() and repeat() functions illustrated above, the millisDelay library also has stop() to stop the delay timing out, isRunning() to check if it has not already timed out and has not been stopped, restart() to restart the delay from now, using the same delay interval, finish() to force the delay to expire early, remaining() to return the number of milliseconds until the delay is finished and delay() to return the delay value that was passed to start()
When the millisDelay times out and justFinished() returns true, you can use either repeat() or restart() to start the delay again with the same timeout setting. If you use restart(), the delay start again just as if you had called start( ..) with the same timeout. However due to loop() delays isFinished() may not be called until a short time after the delay actually times out. If you use restart() this 'drift' or 'creep' in the time will add up and 100 repeats of 1sec will take more then 100secs. On the other hand if you use repeat() instead of restart(), the millisDelay library adjusts for any delay in calling isFinished() and 100 repeats of 1 sec will take 100sec. So if you want things to happen as regular intervals use repeat() for the best accuracy. In any case it is best to keep your loop() responsive and minimize the time between calls to isFinished() see Multi-tasking in Arduino for more details
millisDelay counts the delay in milliseconds. You can also time by microseconds. It is left as an exercise to the reader to write that class. (Hint: rename the class to microDelay and replace occurrences of millis() with micros() )
You can freeze or pause a delay by saving the remaining() milliseconds and stopping the delay and then later un-freeze it by restarting it with the remaining mS as the delay. e.g. see the FreezeDelay.ino example
mainRemainingTime = mainDelay.remaining();  // remember how long left to run in the main delay
mainDelay.stop(); // stop mainDelay  NOTE: mainDelay.justFinished() is NEVER true after stop()
…
mainDelay.start(mainRemainingTime); // restart after freezeUnfortunately many of the standard Arduino libraries use delay() or introduce pauses, such as AnalogRead and SoftwareSerial. Usually the delays these introduce are small but they can add up so I suggest you add a monitor at the top of your loop() to check how quickly it runs. This loop timer can be either the hardware one shown below OR the loopTimer class (also in the SafeString library), used in the Simple Multi-tasking in Arduino tutorial, that prints out the time your loop takes to execute.
The hardware loop monitor is very similar to the blink example. A small piece of code at the top of the loop() method just toggles the Led each time loop() is executed. You can then use a digital multimeter with at Hz scale to measure the frequency of the output on the LED pin (pin 13 in this case)
The code is:-
// Loop Monitor – this checks that the loop() is executed at least once every 1mS
// (c)2013 Forward Computing and Control Pty. Ltd.
// www.forward.com.au
//
// This example code is in the public domain.
int led = 13; // don't use on FioV3 when battery connected
// Pin 13 has an LED connected on most Arduino boards.
// if using Arduino IDE 1.5 or above you can use pre-defined
// LED_BUILTIN  instead of 'led'
//

// the setup routine runs once when you press reset:
void setup() {
  // initialize the digital pin as an output.
  pinMode(led, OUTPUT);
  // add your other setup code here
}

// the loop routine runs over and over again forever:
void loop() {
  // toggle the led output each loop The led frequency must measure >500Hz (i.e. <1mS off and <1mS on)
  if (digitalRead(led)) {
    digitalWrite(led, LOW); // turn the LED off by making the voltage LOW
  } else {
    digitalWrite(led, HIGH); // turn the LED on (HIGH is the voltage level)
  }

  // add the rest of your loop code here
}
You can download the monitor code here. When I run this code on my Uno board, the multimeter on the Hz range connected between pin 13 and GND reads 57.6Khz. i.e. about 100 times >500hz. As you add your code to loop() the Hz reading will reduce. Just check it stays well above 500Hz (1mS per loop() execution) in all situations.
For use of the Arduino name see http://arduino.cc/en/Main/FAQ
The General Purpose Android/Arduino Control App.
pfodDevice™ and pfodApp™ are trade marks of Forward Computing and Control Pty. Ltd.

Contact Forward Computing and Control by
©Copyright 1996-2020 Forward Computing and Control Pty. Ltd.
ACN 003 669 994